Structure of a Hemocytometer
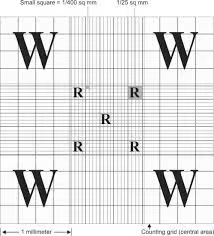
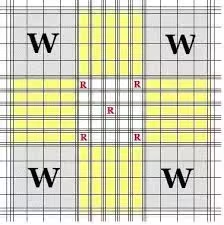
A traditional hemocytometer and Hemocytometry consists of a thick glass microscope slide with a grid etched into the surface, featuring two identical chambers. Each chamber is divided into nine large squares, and these large squares are further subdivided into smaller squares, depending on the specific model. The most commonly used type of hemocytometer is the Neubauer chamber, where the grid’s large squares have an area of 1 mm², subdivided into 25 smaller squares.
- Grid pattern: The central large square (used for blood cells like white and red blood cells) is typically subdivided into smaller squares for higher precision in counting.
- Depth: The chamber has a known depth (usually 0.1 mm), allowing for an accurate calculation of cell concentration.
- Cover slip: A specialized cover slip is placed over the chamber to create a uniform height above the grid, ensuring an even sample distribution.

Hemocytometry
Hemocytometry is widely used in both clinical and research settings. Below are some of its common applications:
- Blood Cell Counting:
- Red Blood Cells (RBC): Hemocytometry counts RBCs in clinical haematology for diagnosing conditions like anaemia or polycythemia.
- White Blood Cells (WBC): WBC counts can help diagnose infections, leukaemia, or immune disorders.
- Platelets: Platelet counts are critical for evaluating bleeding disorders.
- Cell Culture:
- Hemocytometers are often used in cell biology research to determine the concentration of cultured cells before passaging or experimentation.

- Hemocytometers are often used in cell biology research to determine the concentration of cultured cells before passaging or experimentation.
- Sperm Counting:
- Hemocytometers can also be used in reproductive biology to assess sperm concentration in semen samples for fertility studies or artificial insemination.
- Microorganism Counting:
- In microbiology, hemocytometry helps count yeast cells, bacteria, or fungi, particularly when studying growth rates or performing viability assays.
- Viability Tests:
- In addition to counting, hemocytometry can be used with dyes like trypan blue to assess cell viability, distinguishing live from dead cells.
Procedure for Using a Hemocytometer
- Preparation of the Sample:
- The sample is diluted to ensure the cells are spread evenly across the grid.
- Loading the Hemocytometer:
- A small sample volume (usually 10-15 µL) is loaded into the hemocytometer chamber under the coverslip.
- Microscopy:
- Using a microscope, the cells in the designated squares of the grid are counted.
- Calculation
Red Blood Cell count
Principle
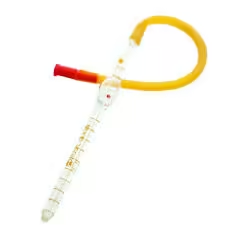
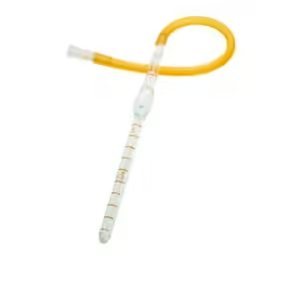
The blood is diluted 200 times in a red cell pipette, and the cells are counted in the counting chamber. Their number in undiluted blood can easily be calculated knowing the dilution employed.
Materials Required
- Blood sample (anticoagulated, usually in EDTA)
- RBC diluting fluid (Hayem’s or Gower’s solution)
- Hemocytometer (Neubauer chamber is most commonly used)

- Microscope
- Coverslip
- Pipette or micropipette
- Test tubes or dilution vials

Procedure for Manual RBC Counting
1. Dilution of the Blood Sample
- Diluting fluid: Use a specific RBC diluting fluid, such as Hayem’s solution (sodium sulfate, sodium chloride, and mercuric chloride) or Gower’s solution. These fluids help preserve and separate the RBCs for easy counting.
- Dilution ratio: Typically, a 1:200 dilution is used. For example, mix 0.02 mL (20 µL) of blood with 4.0 mL of diluting fluid in a test tube.
- Mix the solution: After mixing, the sample should be gently inverted or stirred to ensure an even distribution of RBCs.
2. Loading the Hemocytometer
- Place the hemocytometer on a flat surface.
- Clean the counting chamber and cover slip before use.
- Use a pipette to load a small drop (about 10-15 µL) of the diluted blood sample into one of the chambers of the hemocytometer. The sample should flow into the chamber by capillary action without spilling over.
- Place the cover slip on top, ensuring the sample spreads evenly and fills the chamber.
3. Microscopy and Counting
- Place the hemocytometer on the microscope stage and focus using a low magnification (10x) initially, then switch to a higher magnification (40x) for counting.
- Grid overview: The hemocytometer’s central large square is used for RBC counting. This large square is divided into 25 smaller squares, and each smaller square is divided into 16 tiny squares.
- Count the number of RBCs in 5 large squares (four corners and one centre square of the central grid).
4. Calculation of RBC Count
After counting the RBCs in the 5 large squares, calculate the total RBC count using the following formula:
RBC count (cells/µL) =
(Number of RBCs counted in 5 squares/5) × Dilution factor × 1/Volume of 1 square
Where:
- Number of RBCs counted in 5 squares = Total number of RBCs counted in the selected 5 large squares.
- Dilution factor = 200 (since the blood sample was diluted 1:200).
- Volume of 1 square = The depth of the chamber is 0.1 mm, and each large square is 1 mm² in area, so the volume of one large square is 0.1 mm³ or 0.1 µL.
Precautions
- Ensure the hemocytometer is clean and the coverslip is placed correctly to get an even distribution of cells.
- Mix the blood sample thoroughly before dilution to avoid clumping or uneven cell distribution.
- Count cells consistently within the same boundaries (include cells on the top and left lines, but exclude those on the bottom and right lines).
White Blood Cell (WBC) count
The manual WBC count follows a similar procedure to RBC counting, with specific steps tailored to counting white blood cells.
Principle
A blood sample is diluted with a diluting fluid, which destroys the red cells and stains the nuclei of the leukocytes. The cells are then counted in a counting chamber, and their number in undiluted blood is reported as leukocytes/mm3
Materials Required
- Blood sample (anticoagulated, typically in EDTA)
- WBC diluting fluid (e.g., Turk’s solution: acetic acid, gentian violet, and distilled water)
- Hemocytometer (Neubauer chamber)

- Microscope
- Coverslip
- Pipette or micropipette
- Test tubes or dilution vials

Procedure
1. Dilution of the Blood Sample
- Diluting fluid: Use Turk’s solution, which lyses the red blood cells and stains the WBC nuclei for easier counting.
- Dilution ratio: Typically, a 1:20 dilution is used. For example, mix 0.02 mL (20 µL) of blood with 0.38 mL of Turk’s solution.
- Mix thoroughly to ensure even distribution of WBCs.
2. Loading the Hemocytometer
- Place the clean hemocytometer and cover slip on a flat surface.
- Load a small drop of the diluted sample (10-15 µL) into the chamber.
- Ensure the sample spreads evenly across the grid under the cover slip.
3. Microscopy and Counting
- Place the hemocytometer on the microscope and focus on the grid using low magnification (10x).
- Grid used for WBCs: Count the WBCs in 4 large corner squares of the hemocytometer grid (each large square = 1 mm²).
- Include cells touching each square’s top and left borders, but exclude those on the bottom and right.
4. Calculation of WBC Count
After counting the WBCs in the 4 large squares, calculate the total WBC count using the following formula:
WBC count (cells/µL) = (Number of WBCs counted in 4 squares/4)×Dilution factor×1/Volume of one square
Where:
- Dilution factor = 20 (due to the 1:20 dilution).
- The volume of 1 large square = 0.1 mm³ or 0.1 µL (chamber depth is 0.1 mm, and the area of each large square is 1 mm²).
Precautions
- Ensure proper dilution and mixing of the blood sample to avoid clumping.
- Count cells consistently by following the same rules for borders.
- Use a clean hemocytometer and cover slip for accurate results.
Platelet Count
Platelet counting with a hemocytometer is a manual method to estimate the number of platelets (thrombocytes) in the blood. The process is similar to RBC and WBC counting but uses specific diluting fluids and a different grid area on the hemocytometer.
Materials Required
- Blood sample (anticoagulated, usually in EDTA)
- Platelet diluting fluid (1% ammonium oxalate or Rees-Ecker solution)
- Hemocytometer (Neubauer chamber)
- Microscope
- Coverslip
- Pipette or micropipette
- Test tubes or dilution vials
Procedure
1. Dilution of the Blood Sample
- Diluting fluid: Use 1% ammonium oxalate solution, which lyses the red blood cells but preserves platelets for counting.
- Dilution ratio: A 1:100 dilution is typically used. For example, mix 0.02 mL (20 µL) of blood with 1.98 mL of diluting fluid.
- Mix the sample gently to ensure an even suspension of platelets.
2. Loading the Hemocytometer
- Place a clean hemocytometer on a flat surface.
- Load 10-15 µL of the diluted blood sample into one of the chambers of the hemocytometer under the cover slip.
- Ensure the sample fills the chamber evenly without overflowing.
3. Microscopy and Counting
- Place the hemocytometer on the microscope and focus at 40x magnification.
- Grid used for platelets: Count the platelets in the 25 small squares within the central large square (each small square is 0.04 mm²).
- Count the platelets as small refractile bodies and distinguish them from debris.
4. Calculation of Platelet Count
After counting platelets in the 25 small squares, calculate the platelet count using the following formula:
Platelet count (cells/µL) = (Number of platelets counted/Area counted (in mm²)×Chamber depth (in mm))×Dilution factor
Where:
- Area counted = 1 mm² (since you count 25 small squares of 0.04 mm² each).
- Chamber depth = 0.1 mm.
- Dilution factor = 100 (due to the 1:100 dilution).
Precautions
- Use a clean hemocytometer and coverslip to ensure accurate distribution of the sample.
- Ensure proper mixing and dilution of the sample.
- Distinguish platelets carefully from debris or other particles under the microscope.
Errors Involved in Manual Hemocytometer Counting
Manual cell counting with a hemocytometer, whether for RBCs, WBCs, or platelets, is subject to several sources of error. These can lead to inaccurate cell counts, affecting diagnoses or research outcomes. Here are common errors and means to minimize them:
Common Errors
- Improper Dilution:
- Error: Inaccurate dilutions can lead to too high or too low cell concentrations, affecting count accuracy.
- Solution: Use calibrated pipettes and follow the recommended dilution ratio strictly. Ensure thorough mixing to avoid clumping or uneven distribution of cells.
- Uneven Cell Distribution:
- Error: Cells may not be evenly distributed across the hemocytometer, leading to over-counting or under-counting in certain areas.
- Solution: Mix the sample thoroughly before loading the hemocytometer. Allow cells to settle for a few minutes before counting.
- Overfilling or Underfilling the Chamber:
- Error: Overfilling the chamber leads to too thick a layer of cells, while underfilling leads to too thin a layer, distorting the actual cell count.
- Solution: Ensure the correct volume is loaded under the cover slip. The sample should fill the chamber without spilling over or leaving gaps.
- Improper Cover Slip Placement:
- Error: A poorly placed cover slip creates an uneven distribution of cells and inconsistent chamber depth.
- Solution: Use a clean, correctly positioned coverslip to create the uniform 0.1 mm chamber depth.
- Counting Errors:
- Error: Human error in counting cells can lead to inconsistent results, especially when distinguishing between cells and debris or when cells lie on the boundary lines.
- Solution: Follow the standard rule: count cells touching the top and left boundary lines and exclude those touching the bottom and right boundary lines. Take your time to identify and count cells carefully.
- Small Sample Size:
- Error: Counting too few squares can introduce sampling bias, especially if the cell distribution is uneven.
- Solution: Count a sufficient number of squares (e.g., 5 squares for RBCs, 4 large squares for WBCs, or 25 small squares for platelets) to ensure a representative sample of cells is included.
- Temperature and Evaporation:
- Error: If the sample evaporates, it concentrates cells in certain areas, leading to inaccurate counts.
- Solution: Perform the counting in a controlled environment, avoiding prolonged exposure to air, and work promptly.
- Cell Lysis or Damage:
- Error: Cells can be damaged during dilution or sample preparation, leading to undercounting.
- Solution: Use appropriate diluting fluids that preserve the integrity of the cells being counted (e.g., use isotonic solutions for RBCs and WBCs).
Ways to Minimize Errors
- Proper Sample Handling:
- Mix the sample thoroughly before loading the hemocytometer to ensure an even distribution of cells.
- Prepare fresh dilutions to prevent cell degradation or aggregation.
- Consistent Counting Technique:
- Use the same inclusion/exclusion rule for counting cells at the grid boundaries.
- Take multiple counts and average the results to reduce human error.
- Adequate Number of Squares:
- Count larger squares (at least 100 cells) to ensure a more representative sample and improve accuracy.
- Calibrated Equipment:
- Use well-calibrated pipettes for accurate dilution and ensure the hemocytometer grid is clean and intact.
- Repeat Counting:
- Perform the counting multiple times and average the counts to improve accuracy.
- If counts vary significantly, re-prepare the sample and re-count.
- Proper Environment:
- Conduct the procedure in a well-controlled environment to minimize evaporation and sample degradation.
- Quality Control:
- Regularly perform quality control checks by comparing manual and automated counts (if available) or using reference materials.