Introduction
-
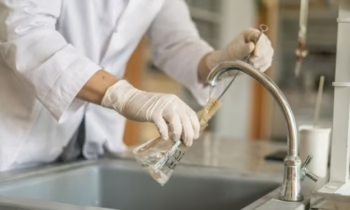
Medical laboratory instruments and equipment play a vital role in the accurate diagnosis, monitoring, and treatment of diseases.
-
These tools, ranging from simple microscopes and centrifuges to advanced analyzers and incubators, ensure precision in laboratory investigations.
-
The reliability of laboratory results depends not only on the proper use of these instruments but also on their regular care and maintenance.
-
Proper handling, routine cleaning, timely calibration, and adherence to safety protocols help extend the lifespan of equipment, minimize errors, and ensure consistent performance.
-
A well-maintained laboratory environment not only supports efficiency but also safeguards the health of laboratory personnel and patients by reducing the risk of contamination and inaccurate results.

Analytical & Diagnostic Instruments
Spectrophotometer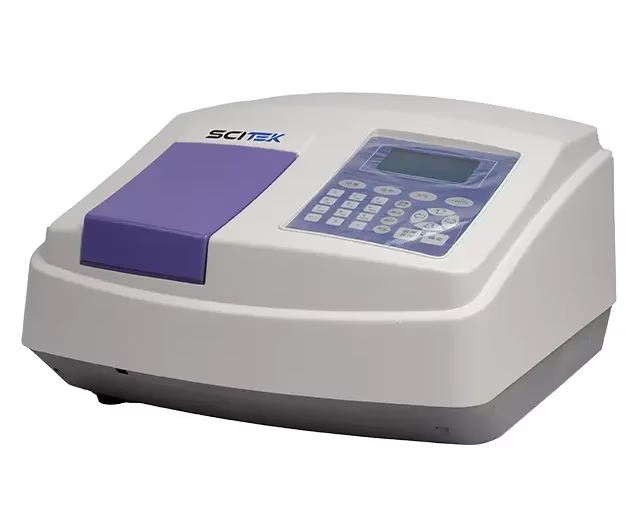
Working Principle:
-
A spectrophotometer works on the principle of Beer-Lambert’s Law, which states that the absorbance of light by a solution is directly proportional to the concentration of the solute and the path length of the light through the solution.
-
A light source emits a broad spectrum of light, which passes through a monochromator (prism or diffraction grating) to isolate a specific wavelength.
-
The selected wavelength of light is directed through the sample solution placed in a cuvette.
-
The amount of light absorbed by the solution is measured by a photodetector, which converts the transmitted light into an electrical signal.
-
The spectrophotometer then displays absorbance or transmittance values, which can be used to determine the concentration of the analyte.

Uses:
-
Quantitative estimation of biomolecules such as proteins, nucleic acids, and enzymes.
-
Measurement of blood and urine analytes in clinical laboratories.
-
Determination of drug concentration in pharmaceutical analysis.
-
Study of enzyme kinetics and reaction rates.
-
Identification of compounds based on their absorption spectra.
-
Quality control in food, chemical, and biochemical industries.
-
Measurement of bacterial growth by optical density at 600 nm (OD600).
-
Environmental monitoring, such as analysis of pollutants in water.
Care:
-
Handle the instrument gently and place it on a stable, vibration-free surface.
-
Always use clean and scratch-free cuvettes to avoid light scattering and errors.
-
Do not touch cuvette surfaces with bare fingers; use lint-free tissue.
-
Ensure that the light source (lamp) is not switched on unnecessarily to increase its lifespan.
-
Keep the sample chamber free from dust, spills, and moisture.
-
Cover the spectrophotometer when not in use to protect it from dust.
Maintenance:
-
Perform regular calibration using standard solutions or reference filters to maintain accuracy.
-
Periodically check and replace the light source (tungsten or deuterium lamp) when intensity decreases.
-
Inspect and clean the monochromator and optical path with appropriate cleaning agents if required.
-
Verify wavelength accuracy with calibration standards at set intervals.
-
Maintain the photodetector by ensuring it is free of dust and functioning properly.
-
Follow the manufacturer’s recommended service schedule for preventive maintenance.
-
Keep proper records of calibration, servicing, and repairs for quality assurance.
-
Ensure proper electrical supply with a stabilizer or UPS to prevent voltage fluctuations.
Colorimeter
Working Principle:
-
A colorimeter works on the principle of Beer-Lambert’s Law, where the intensity of color of a solution is proportional to the concentration of the colored solute.
-
A specific wavelength of light is passed through a solution in a cuvette.
-
The solution absorbs some of the light, and the remaining transmitted light reaches the detector.
-
The detector converts light intensity into an electrical signal.
-
The instrument calculates either absorbance or transmittance, which can be correlated with the solute concentration.
-
Only solutions that are colored or can form a colored complex can be analyzed.

Uses:
-
Quantitative determination of colored compounds in clinical samples (e.g., hemoglobin, bilirubin).
-
Estimation of enzyme activity in biochemical studies.
-
Measurement of concentration in pharmaceutical formulations.
-
Determination of protein concentration using colorimetric assays (e.g., Biuret, Lowry).
-
Environmental monitoring such as water analysis for pollutants or chemical contaminants.
-
Food industry applications for color intensity analysis.
-
Quality control and standardization in chemical and biochemical laboratories.
Care:
-
Use clean and scratch-free cuvettes to avoid errors.
-
Do not touch cuvette surfaces with bare fingers; use lint-free tissue or gloves.
-
Handle the instrument gently and place it on a stable, vibration-free surface.
-
Keep the instrument covered when not in use to prevent dust accumulation.
-
Avoid spilling liquids on the instrument, especially near the optical path and detector.
-
Ensure proper alignment of the cuvette in the sample holder for accurate readings.
Maintenance:
-
Regularly calibrate the colorimeter using standard solutions or reference filters.
-
Inspect the light source (usually tungsten or LED) and replace it if intensity decreases.
-
Clean the optical path and lenses carefully as per manufacturer guidelines.
-
Verify wavelength accuracy periodically to maintain precision.
-
Keep proper documentation of calibration, servicing, and any repairs.
-
Ensure stable electrical supply; use a voltage stabilizer or UPS if necessary.
-
Follow manufacturer’s preventive maintenance schedule to avoid sudden breakdowns.
-
Store the instrument in a clean, dry place and avoid exposure to high temperature or humidity.
pH Meter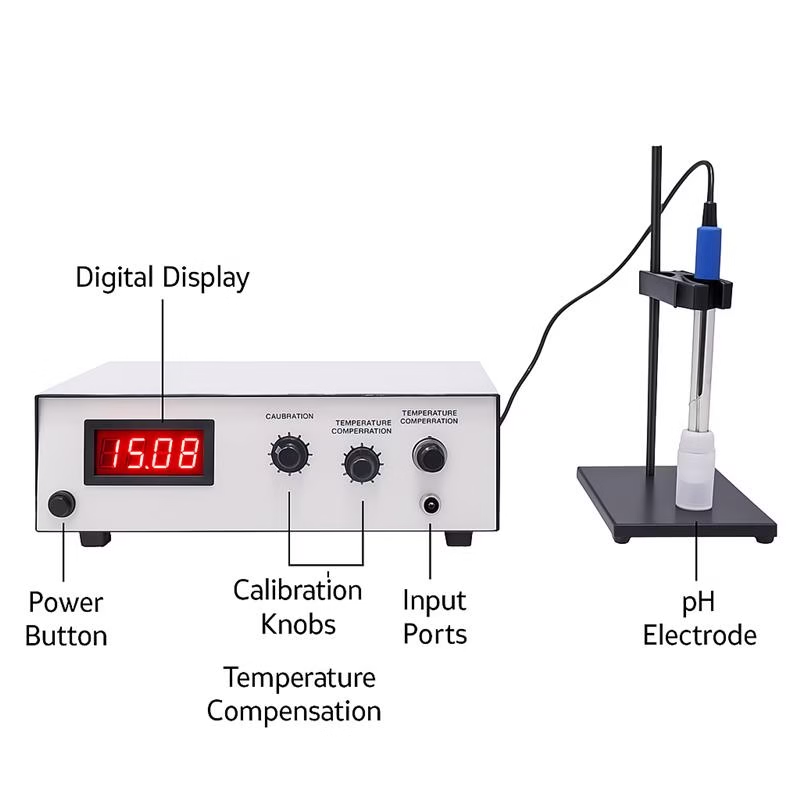
Working Principle:
-
A pH meter measures the hydrogen ion concentration (pH) of a solution using an electrochemical method.
-
It consists of a glass electrode (measuring electrode) and a reference electrode connected to a voltmeter or a digital display.
-
The glass electrode develops a potential (voltage) proportional to the hydrogen ion activity in the solution.
-
The reference electrode provides a stable reference potential.
-
The pH meter measures the potential difference between the electrodes and converts it into a pH value using calibration curves.
-
It works accurately only when properly calibrated with standard buffer solutions.
Uses:
-
Measurement of pH in biological samples like blood, urine, and serum.
-
Determination of pH in pharmaceutical formulations.
-
Monitoring pH in chemical and biochemical reactions.
-
Measurement of pH in water, soil, and environmental samples.
-
Industrial applications in food, beverage, and chemical industries.
-
Quality control in laboratories to maintain optimal conditions for experiments.
Care:
-
Always rinse the electrode with distilled water before and after use.
-
Avoid touching the glass electrode surface with fingers.
-
Do not allow the electrode to dry out; store it in electrode storage solution.
-
Handle the instrument gently and avoid sudden shocks or vibrations.
-
Avoid contamination of the electrode by immersing it only in the sample solution.
-
Keep the meter and electrodes clean and dust-free.
Maintenance:
-
Calibrate the pH meter regularly using standard buffer solutions (pH 4, 7, 10).
-
Replace the electrode if response becomes slow or inaccurate.
-
Store the electrode in storage solution or a moist environment to prevent drying.
-
Check the reference electrode solution periodically and refill if necessary.
-
Inspect cables and connections for damage; replace if needed.
-
Follow the manufacturer’s preventive maintenance schedule.
-
Keep proper records of calibration, maintenance, and electrode replacement.
-
Ensure stable power supply and avoid voltage fluctuations to protect the instrument.
Electrophoresis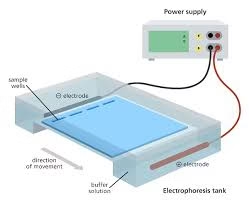
Working Principle:
-
Electrophoresis is a technique used to separate charged molecules (like proteins, nucleic acids) based on their size and charge.
-
It works on the principle that charged particles move in an electric field: cations move toward the cathode and anions toward the anode.
-
Molecules are applied to a support medium such as agarose gel, polyacrylamide gel, or cellulose acetate.
-
When an electric current is applied, molecules migrate through the medium at rates proportional to their size, shape, and charge.
-
After separation, molecules are visualized using dyes or staining methods (e.g., Coomassie Blue for proteins, ethidium bromide for DNA).
Uses:
-
Separation and analysis of proteins in clinical and research laboratories.
-
DNA and RNA analysis in molecular biology studies.
-
Detection of genetic disorders or mutations.
-
Purification of biomolecules for further biochemical experiments.
-
Identification of microorganisms in microbiology using protein or DNA profiles.
-
Quality control in biotechnology and pharmaceutical industries.
-
Forensic applications for DNA fingerprinting and paternity testing.
-
Measurement of enzyme isoforms or hemoglobin variants.
Care:
-
Handle gels carefully to prevent tearing or damage.
-
Use clean and dry electrodes and buffer chambers.
-
Avoid spilling buffer or samples on the power supply or unit.
-
Do not overload wells with sample to ensure proper separation.
-
Keep the electrophoresis chamber and accessories covered when not in use to prevent dust accumulation.
-
Follow proper electrical safety precautions while using the apparatus.
Maintenance:
-
Regularly clean the gel trays, combs, and buffer chambers after use.
-
Inspect electrodes and wiring for corrosion or damage.
-
Ensure proper functioning of the power supply before each experiment.
-
Replace worn-out or damaged components like electrodes, combs, or gel trays.
-
Store the electrophoresis unit in a dry and dust-free environment.
-
Keep records of maintenance, repairs, and calibrations.
-
Avoid long-term storage of gels in the chamber to prevent damage to the unit.
-
Follow manufacturer guidelines for periodic preventive maintenance of the instrument.
Centrifuge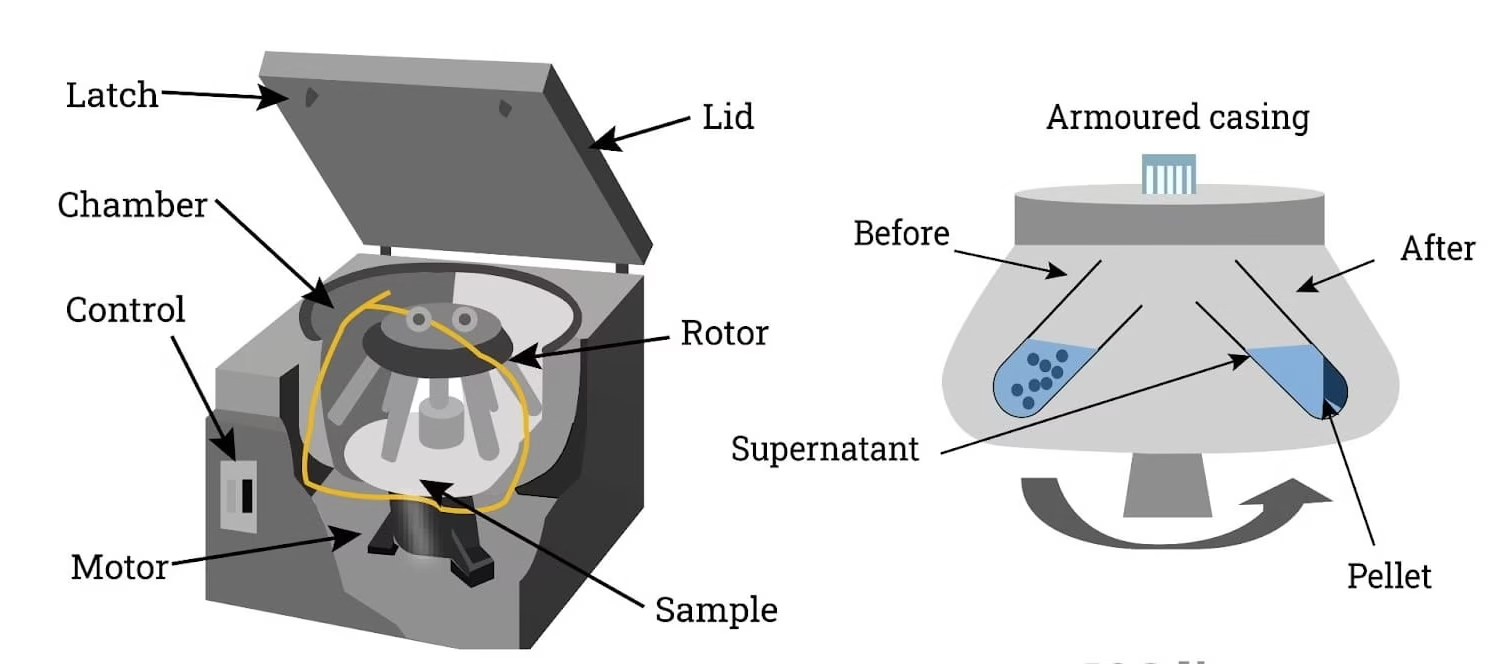
Working Principle:
-
A centrifuge works on the principle of centrifugal force, which separates components of a mixture based on their density.
-
When a sample is rotated at high speeds, denser particles move outward toward the bottom of the tube, while lighter components remain closer to the top.
-
The relative centrifugal force (RCF) depends on the speed (rpm) and radius of rotation.
-
Different types of centrifuges (e.g., microcentrifuge, high-speed, ultracentrifuge) are used depending on the sample type and separation requirement.
-
Separation can be for solids from liquids, different cellular components, or macromolecules like proteins and nucleic acids.
Uses:
-
Separation of blood components such as plasma, serum, and blood cells.
-
Isolation of cellular organelles like nuclei, mitochondria, and lysosomes.
-
Purification of proteins, DNA, and RNA in biochemical experiments.
-
Removal of debris from samples before analysis.
-
Concentration of microorganisms or particulate matter.
-
Clinical laboratories for urine, CSF, and other body fluid analyses.
-
Industrial applications for separating emulsions or suspensions.
-
Preparation of samples for electrophoresis or other analytical procedures.
Care:
-
Ensure tubes are properly balanced before starting the centrifuge to avoid vibrations and damage.
-
Use compatible centrifuge tubes and do not exceed the recommended volume.
-
Close the lid properly before switching on the instrument.
-
Handle the rotor carefully; avoid touching it with bare hands to prevent corrosion.
-
Keep the centrifuge clean and free from spills, dust, and debris.
-
Avoid sudden stops or changes in speed that may damage the rotor or samples.
Maintenance:
-
Regularly inspect the rotor for signs of corrosion, cracks, or wear.
-
Lubricate moving parts as per manufacturer guidelines to ensure smooth operation.
-
Periodically calibrate the speed and temperature (for refrigerated centrifuges).
-
Clean the chamber and rotor with mild detergents and distilled water; avoid harsh chemicals.
-
Replace worn-out or damaged rotor, lid, or seals immediately.
-
Keep records of service, calibration, and preventive maintenance.
-
Ensure proper electrical supply with voltage stabilizers to protect the motor and electronics.
-
Follow the manufacturer-recommended preventive maintenance schedule to prolong instrument life.
Flame Photometer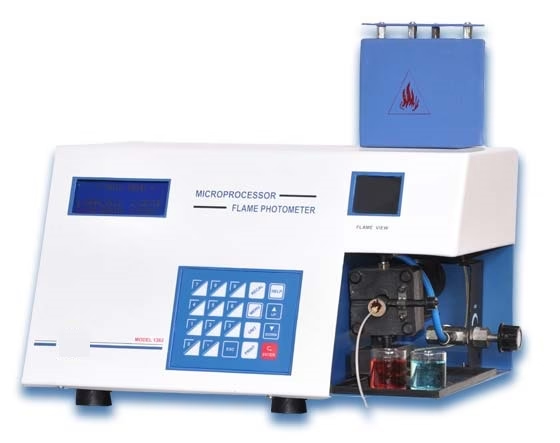
Working Principle:
-
A flame photometer works on the principle of emission spectrophotometry, where atoms of certain elements emit light when heated in a flame.
-
The sample solution is aspirated into a flame, usually fueled by air and acetylene.
-
The heat of the flame excites the metal ions (e.g., Na⁺, K⁺, Ca²⁺, Li⁺) in the solution, causing them to emit light at characteristic wavelengths.
-
A filter or monochromator isolates the specific wavelength of emitted light.
-
The intensity of the emitted light is measured by a photodetector and is directly proportional to the concentration of the element in the sample.
Uses:
-
Quantitative estimation of sodium (Na⁺), potassium (K⁺), lithium (Li⁺), and calcium (Ca²⁺) in biological fluids.
-
Monitoring electrolyte balance in clinical samples like blood serum, plasma, and urine.
-
Determination of trace elements in pharmaceutical and industrial samples.
-
Soil and water analysis for metal ions in environmental studies.
-
Quality control in food and beverage industries for mineral content.
-
Biochemical studies requiring measurement of ionic concentrations.
Care:
-
Use clean and dry sample containers and aspirators to avoid contamination.
-
Handle the instrument gently and avoid spilling samples on the flame or detector.
-
Ensure the flame is stable and the fuel supply (acetylene) is secure.
-
Avoid touching the optical parts with bare hands; use lint-free tissue if cleaning is needed.
-
Keep the instrument covered when not in use to prevent dust accumulation.
Maintenance:
-
Regularly clean the nebulizer, burner, and aspirator to prevent blockages.
-
Inspect and replace worn or damaged parts like the fuel hose or burner tip.
-
Calibrate the instrument periodically using standard solutions of known concentration.
-
Ensure proper alignment of filters or monochromators for accurate measurements.
-
Keep proper records of maintenance, calibration, and repairs.
-
Follow manufacturer guidelines for preventive maintenance and service schedule.
-
Ensure a stable electrical supply and proper ventilation to prevent overheating.
-
Check flame color and stability before every use to ensure accurate readings.
Blood Gas Analyzer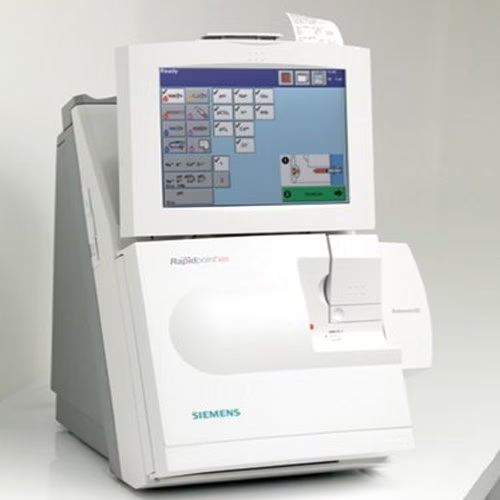
Working Principle:
-
A blood gas analyzer measures partial pressures of gases (pO₂, pCO₂), pH, and electrolytes in blood using electrochemical sensors.
-
The Clark electrode is used to measure oxygen (pO₂) based on current generated by oxygen reduction at the cathode.
-
The Severinghaus electrode measures carbon dioxide (pCO₂) via a pH change in a bicarbonate solution equilibrated with CO₂.
-
The glass electrode is used to determine hydrogen ion concentration (pH).
-
Some modern analyzers also use ion-selective electrodes to measure electrolytes such as Na⁺, K⁺, and Ca²⁺.
-
The instrument converts the electrical signals from the electrodes into digital readings, providing accurate values of blood gases, pH, and electrolytes.
Uses:
-
Assessment of acid-base balance in patients.
-
Measurement of oxygenation and ventilation status in critically ill patients.
-
Monitoring respiratory and metabolic disorders.
-
Guiding therapy in intensive care, anesthesia, and emergency medicine.
-
Measurement of electrolytes in blood for clinical management.
-
Evaluation of patients with cardiac or pulmonary diseases.
-
Monitoring patients on mechanical ventilation.
Care:
-
Handle blood samples carefully to avoid air bubbles or clotting.
-
Use clean syringes and capillary tubes for sampling.
-
Ensure electrodes are clean and free from contamination.
-
Avoid touching sensitive electrodes with bare hands.
-
Keep the analyzer in a clean, dust-free, and vibration-free environment.
-
Follow proper sample handling and storage guidelines to maintain accuracy.
Maintenance:
-
Calibrate the electrodes regularly using standard calibration solutions.
-
Replace electrodes or membranes as per manufacturer guidelines.
-
Perform periodic quality control tests using control solutions.
-
Clean the sample chamber, electrodes, and other components as recommended.
-
Keep logs of calibration, maintenance, and quality control for records.
-
Ensure stable power supply and check electrical connections regularly.
-
Follow manufacturer’s preventive maintenance schedule to ensure long-term reliability.
-
Check and refill reference solutions and buffers when required.
Sample Handling & Preparation
Vortex Mixer
Working Principle:
-
A vortex mixer works on the principle of circular motion to mix small volumes of liquid rapidly.
-
The motorized platform or cup holder oscillates in a circular or orbital motion.
-
When a test tube or container is pressed against the platform, the liquid inside is subjected to rapid swirling, creating a vortex.
-
The vortex motion mixes the contents uniformly in a short period.
-
The speed of the vortex can often be adjusted depending on the mixing requirement.
Uses:
-
Mixing reagents in test tubes, microcentrifuge tubes, or small containers.
-
Dissolving solids in liquids or resuspending precipitates.
-
Preparation of chemical, biochemical, or microbiological samples.
-
Homogenization of samples before analysis.
-
Rapid mixing in ELISA or other enzyme assays.
-
Mixing of DNA, RNA, or protein solutions in molecular biology experiments.
Care:
-
Place the mixer on a stable, vibration-free surface to prevent movement.
-
Avoid overloading the platform with heavy tubes or containers.
-
Ensure the tubes are properly closed to prevent spillage.
-
Keep the device clean and free from dust and liquid spills.
-
Do not press the tube too hard against the platform to avoid damage.
-
Use tubes compatible with the mixer to avoid imbalance.
Maintenance:
-
Regularly inspect the power cord and plug for damage.
-
Lubricate moving parts if recommended by the manufacturer.
-
Check and tighten screws or fasteners periodically.
-
Clean the platform with a mild detergent and soft cloth.
-
Avoid exposure to excessive moisture or corrosive chemicals.
-
Follow manufacturer’s preventive maintenance schedule for the motor.
-
Keep records of service or repairs if any.
-
Ensure proper electrical supply and avoid voltage fluctuations to prevent motor damage.
Water Bath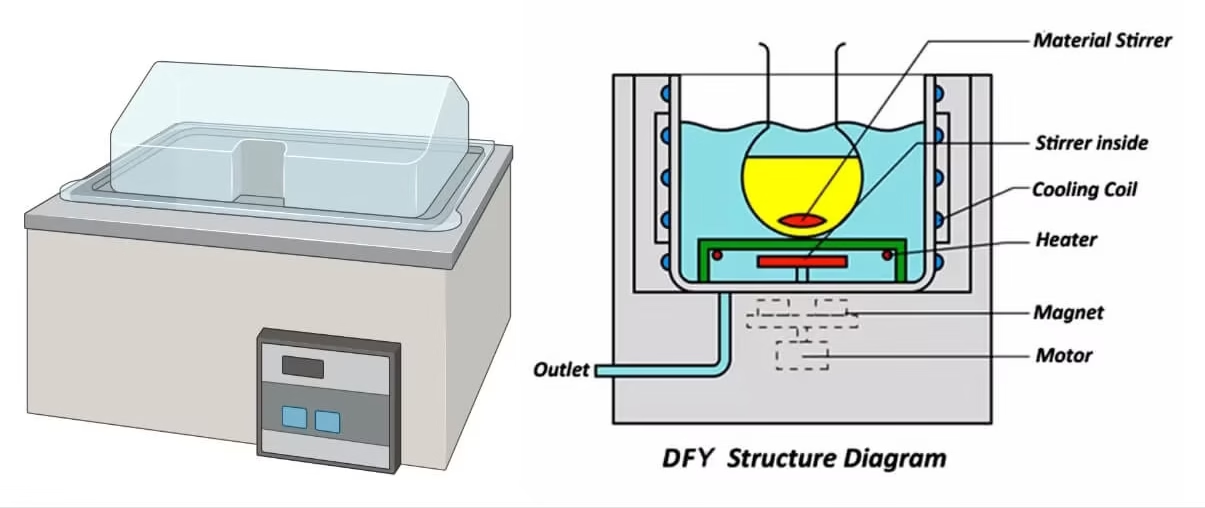
Working Principle:
-
A water bath works on the principle of heat transfer through water to maintain a uniform temperature for samples.
-
It consists of a container filled with water and an electric heating element to heat the water.
-
A thermostat or digital controller regulates the temperature by switching the heater on and off.
-
The heated water provides indirect, uniform heating to the sample containers placed in it.
-
Some water baths also include circulating pumps to ensure even temperature distribution.
Uses:
-
Incubation of biological samples at a constant temperature.
-
Warming reagents before experiments.
-
Enzyme reactions and biochemical assays requiring controlled temperature.
-
Thawing frozen samples or melting agar/media.
-
Sterilization or heating of certain laboratory glassware and containers.
-
Maintenance of cell cultures or bacterial cultures at optimal temperatures.
-
Heat inactivation of serum or other biological samples.
Care:
-
Always use distilled water to prevent mineral buildup.
-
Ensure water level is sufficient to cover the sample containers properly.
-
Avoid direct contact of electrical parts with water.
-
Keep the bath clean and free from spills or debris.
-
Monitor the temperature to prevent overheating.
-
Do not allow water to boil dry during use.
Maintenance:
-
Regularly clean the bath using mild detergent and rinse thoroughly.
-
Change water frequently to prevent bacterial growth and mineral deposits.
-
Inspect heating elements for signs of wear or corrosion.
-
Calibrate the temperature controller periodically for accuracy.
-
Check and maintain the thermostat or digital control system.
-
Keep a log of maintenance, cleaning, and calibration.
-
Store the bath in a dry, dust-free environment when not in use.
-
Follow manufacturer’s preventive maintenance instructions to ensure long-term reliability.
Hot Plate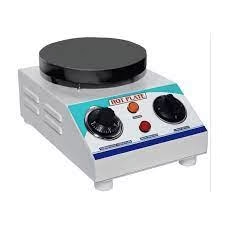
Working Principle:
-
A hot plate works on the principle of electrical resistance heating, where electric current passes through a heating element to generate heat.
-
The heat is transferred to the plate surface and subsequently to the container placed on it.
-
Some hot plates include a magnetic stirrer, which allows simultaneous heating and mixing of liquids.
-
Temperature is controlled using a thermostat or digital controller to maintain the desired heat level.
-
Heat transfer is mostly direct, requiring careful monitoring of temperature-sensitive samples.
Uses:
-
Heating of chemicals and solutions in laboratories.
-
Melting of solids or reagents.
-
Boiling of water or other liquids for experiments.
-
Preparation of culture media or agar plates.
-
Evaporation of solvents in sample preparation.
-
Heating samples before chemical reactions.
-
Combined heating and stirring in biochemical and molecular biology experiments (for magnetic stirrer hot plates).
Care:
-
Ensure the hot plate is placed on a stable, heat-resistant surface.
-
Avoid spilling liquids on the plate or electrical parts.
-
Do not touch the surface while it is hot; use heat-resistant gloves.
-
Keep the surface clean and free from chemical residues.
-
Avoid overheating or running the hot plate empty for long periods.
-
Use appropriate containers compatible with the hot plate surface.
Maintenance:
-
Regularly inspect the power cord, plug, and control knobs for damage.
-
Clean the surface with a damp cloth and mild detergent; avoid abrasive cleaners.
-
Check temperature accuracy with a thermometer periodically.
-
Ensure that magnetic stirrer functionality is working properly (if applicable).
-
Replace worn-out or damaged heating elements as recommended by the manufacturer.
-
Follow the manufacturer’s preventive maintenance schedule for long-term reliability.
-
Keep records of service, repairs, and calibration for quality assurance.
-
Ensure stable electrical supply and avoid voltage fluctuations to prevent damage.
Incubator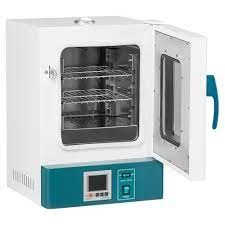
Working Principle:
-
An incubator works on the principle of maintaining a controlled environment for the growth of microorganisms, cells, or tissues.
-
It provides constant temperature, usually through an electric heating element regulated by a thermostat or digital controller.
-
Humidity can be maintained using a water reservoir in the incubator chamber.
-
Some incubators also provide CO₂ control for cell culture experiments, maintaining pH and optimal growth conditions.
-
Air circulation is often ensured with fans to maintain uniform temperature and gas distribution throughout the chamber.
Uses:
-
Growth and maintenance of bacterial, fungal, or other microbial cultures.
-
Incubation of cell cultures for research or clinical studies.
-
Culture of embryos or other biological samples in research labs.
-
Biochemical and molecular biology experiments requiring constant temperature.
-
Study of microbial growth kinetics and antibiotic susceptibility.
-
Maintenance of clinical specimens before analysis.
-
Environmental testing of samples at controlled temperature.
Care:
-
Keep the incubator clean and free from dust.
-
Avoid overloading the shelves with samples to allow proper air circulation.
-
Monitor water reservoir (if humidity is required) to prevent drying out.
-
Avoid spilling liquids on electrical components.
-
Keep the door closed as much as possible to maintain temperature stability.
-
Handle samples carefully to prevent contamination.
Maintenance:
-
Regularly clean and disinfect the chamber, shelves, and water reservoir.
-
Calibrate the temperature and CO₂ (if applicable) periodically for accuracy.
-
Inspect and service electrical components, heating elements, and fans.
-
Replace worn-out seals or door gaskets to maintain airtight conditions.
-
Keep a log of calibration, maintenance, and repairs.
-
Check and refill humidity or CO₂ systems as needed.
-
Ensure a stable electrical supply to avoid fluctuations that can damage the incubator.
-
Follow the manufacturer’s preventive maintenance schedule to prolong equipment life.
Imaging Equipment
Compound Microscope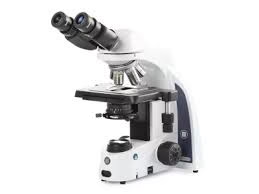
Working Principle:
-
A compound microscope works on the principle of light refraction to magnify small objects.
-
It uses two sets of lenses: the objective lens (close to the specimen) and the ocular lens (eyepiece) to achieve high magnification.
-
Light from an illuminator or mirror passes through the specimen, is refracted by the objective lens to form a real image, and then magnified by the ocular lens to form a virtual image.
-
Total magnification is calculated as the product of the objective lens magnification and the ocular lens magnification.
-
Fine and coarse focus adjustments allow clear visualization of specimens at different magnifications.
Uses:
-
Observation and study of cells, tissues, and microorganisms in biological and clinical laboratories.
-
Examination of blood smears, urine sediments, and microbial cultures.
-
Study of plant and animal histology for research or teaching purposes.
-
Microbiological analysis of bacteria, fungi, and protozoa.
-
Quality control in pharmaceutical and food industries.
-
Research in molecular biology, pathology, and biochemistry.
-
Identification of structural abnormalities in clinical specimens.
Care:
-
Handle the microscope carefully and avoid sudden movements or shocks.
-
Keep lenses clean using lens paper; avoid touching them with fingers.
-
Always cover the microscope with a dust cover when not in use.
-
Avoid exposure to direct sunlight or high humidity.
-
Do not use excessive force on focus knobs or stage adjustments.
-
Clean the stage and body with a soft, dry cloth regularly.
Maintenance:
-
Regularly clean and inspect objective and ocular lenses; replace if damaged.
-
Check the light source or mirror for proper illumination.
-
Ensure smooth functioning of mechanical parts like stage, focus knobs, and condenser.
-
Lubricate moving parts if recommended by the manufacturer.
-
Keep a record of servicing, calibration, and repairs.
-
Store the microscope in a dry, dust-free, and stable environment.
-
Avoid using harsh chemicals on any part of the microscope.
-
Follow manufacturer guidelines for preventive maintenance to ensure long-term reliability.
Measurement & Weighing Instruments
Analytical Balance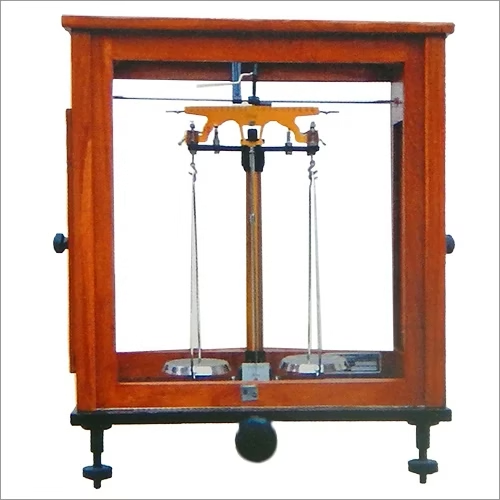
Working Principle:
-
An analytical balance works on the principle of electromagnetic force restoration or mechanical lever systems to measure mass with high precision.
-
When a sample is placed on the pan, it causes a displacement. The balance generates an electromagnetic force to restore the pan to its original position.
-
The magnitude of the electromagnetic force is proportional to the mass of the sample.
-
The digital or dial display shows the measured mass, often up to 0.1 mg or 0.01 mg.
-
Some balances use electronic sensors and load cells to enhance precision and reduce human error.
Uses:
-
Accurate measurement of chemicals, reagents, and samples in laboratory experiments.
-
Preparation of standard solutions and buffers in biochemical and chemical labs.
-
Quantitative analysis in pharmaceutical, clinical, and research laboratories.
-
Weighing small biological samples, powders, and solids.
-
Quality control in industries requiring precise measurement of ingredients.
-
Measurement of fine particulate matter in environmental studies.
Care:
-
Place the balance on a stable, vibration-free, and level surface.
-
Keep the balance clean and free from dust, powders, and moisture.
-
Avoid touching the weighing pan with bare hands.
-
Do not overload the balance beyond its maximum capacity.
-
Use the balance in a draft-free environment to prevent fluctuations in readings.
-
Always use weighing paper, containers, or boats to avoid direct contact with samples.
Maintenance:
-
Calibrate the balance regularly using standard calibration weights.
-
Perform internal calibration if the balance has an auto-calibration feature.
-
Inspect the pan and sensors for dirt or damage; clean with a soft brush or cloth.
-
Avoid exposure to corrosive chemicals near the balance.
-
Keep records of calibration, maintenance, and any repairs.
-
Service the balance periodically as recommended by the manufacturer.
-
Ensure stable electrical supply and avoid voltage fluctuations to protect electronic components.
-
Cover the balance with a dust cover when not in use.
Sterilization & Safety Equipment
Autoclave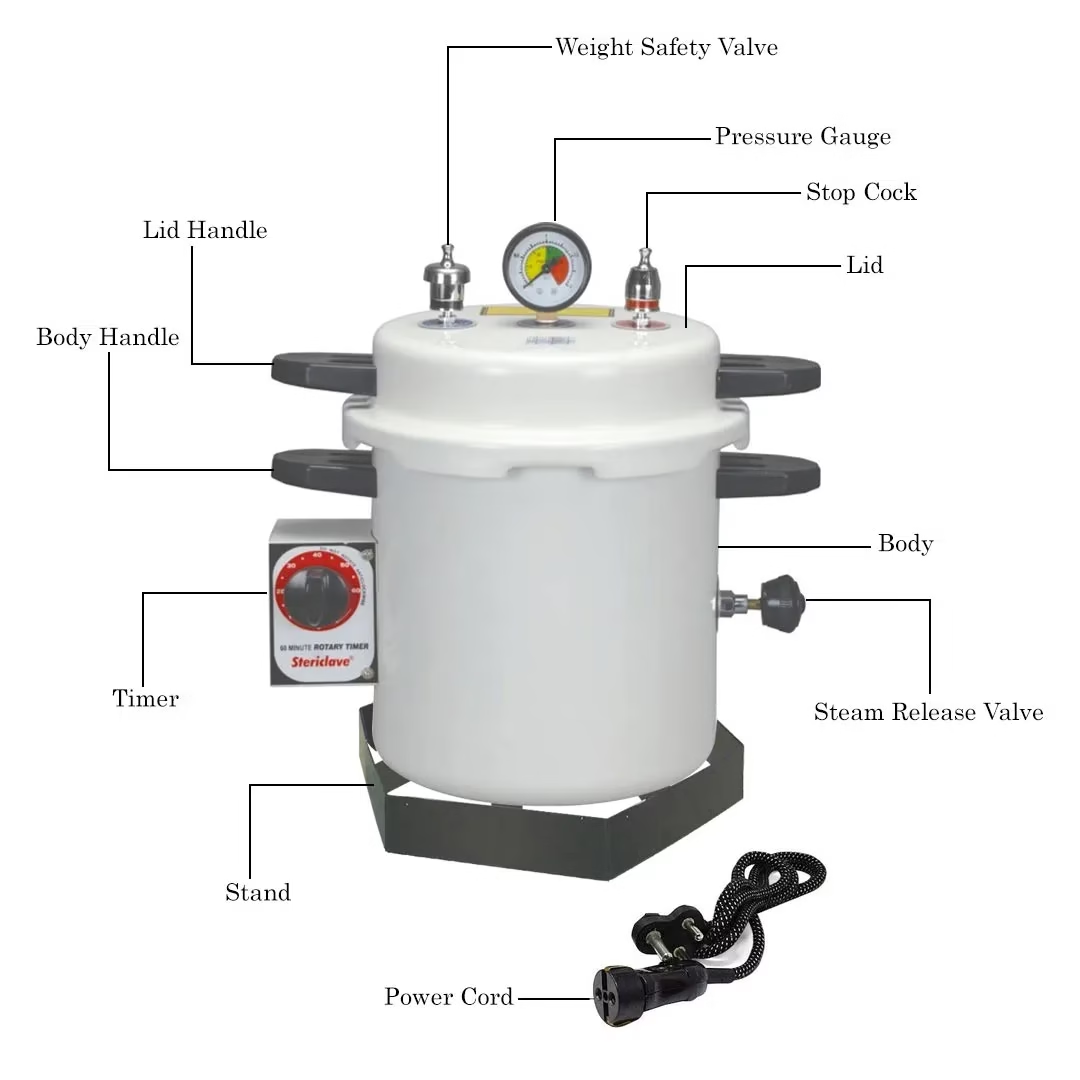
Working Principle:
-
An autoclave works on the principle of steam sterilization under pressure, using saturated steam at high temperature.
-
Typical sterilization is done at 121°C under 15 psi pressure for 15–20 minutes (time may vary depending on load).
-
The high-pressure steam denatures proteins and kills microorganisms, including bacterial spores.
-
The autoclave chamber allows steam penetration into instruments, media, or other materials to achieve complete sterilization.
-
Sterilization cycles are controlled by timers and thermostats or digital control panels.
Uses:
-
Sterilization of surgical instruments, glassware, and laboratory equipment.
-
Sterilization of culture media, reagents, and liquids in microbiology and biochemistry labs.
-
Decontamination of biological waste before disposal.
-
Preparation of sterile solutions and buffers.
-
Sterilization of lab clothing, plasticware, and other consumables.
-
Ensuring aseptic conditions in cell culture and molecular biology experiments.
Care:
-
Do not overload the chamber; leave space for steam circulation.
-
Use distilled water to prevent mineral deposits and scaling.
-
Ensure all items are properly closed or wrapped to allow steam penetration.
-
Avoid direct contact with hot surfaces; use heat-resistant gloves.
-
Check the door seal and locking mechanism before each cycle.
-
Keep the autoclave clean and free from spills or debris.
Maintenance:
-
Regularly clean the chamber, trays, and door gasket.
-
Check and replace worn or damaged seals, gaskets, and valves.
-
Inspect the water reservoir and refill with distilled water as needed.
-
Perform routine validation and biological spore testing to ensure sterilization efficiency.
-
Check and calibrate pressure and temperature sensors periodically.
-
Keep records of sterilization cycles, maintenance, and repairs.
-
Follow manufacturer’s preventive maintenance schedule to prolong autoclave life.
-
Ensure a stable electrical supply and proper ventilation to avoid damage.
Hot Air Oven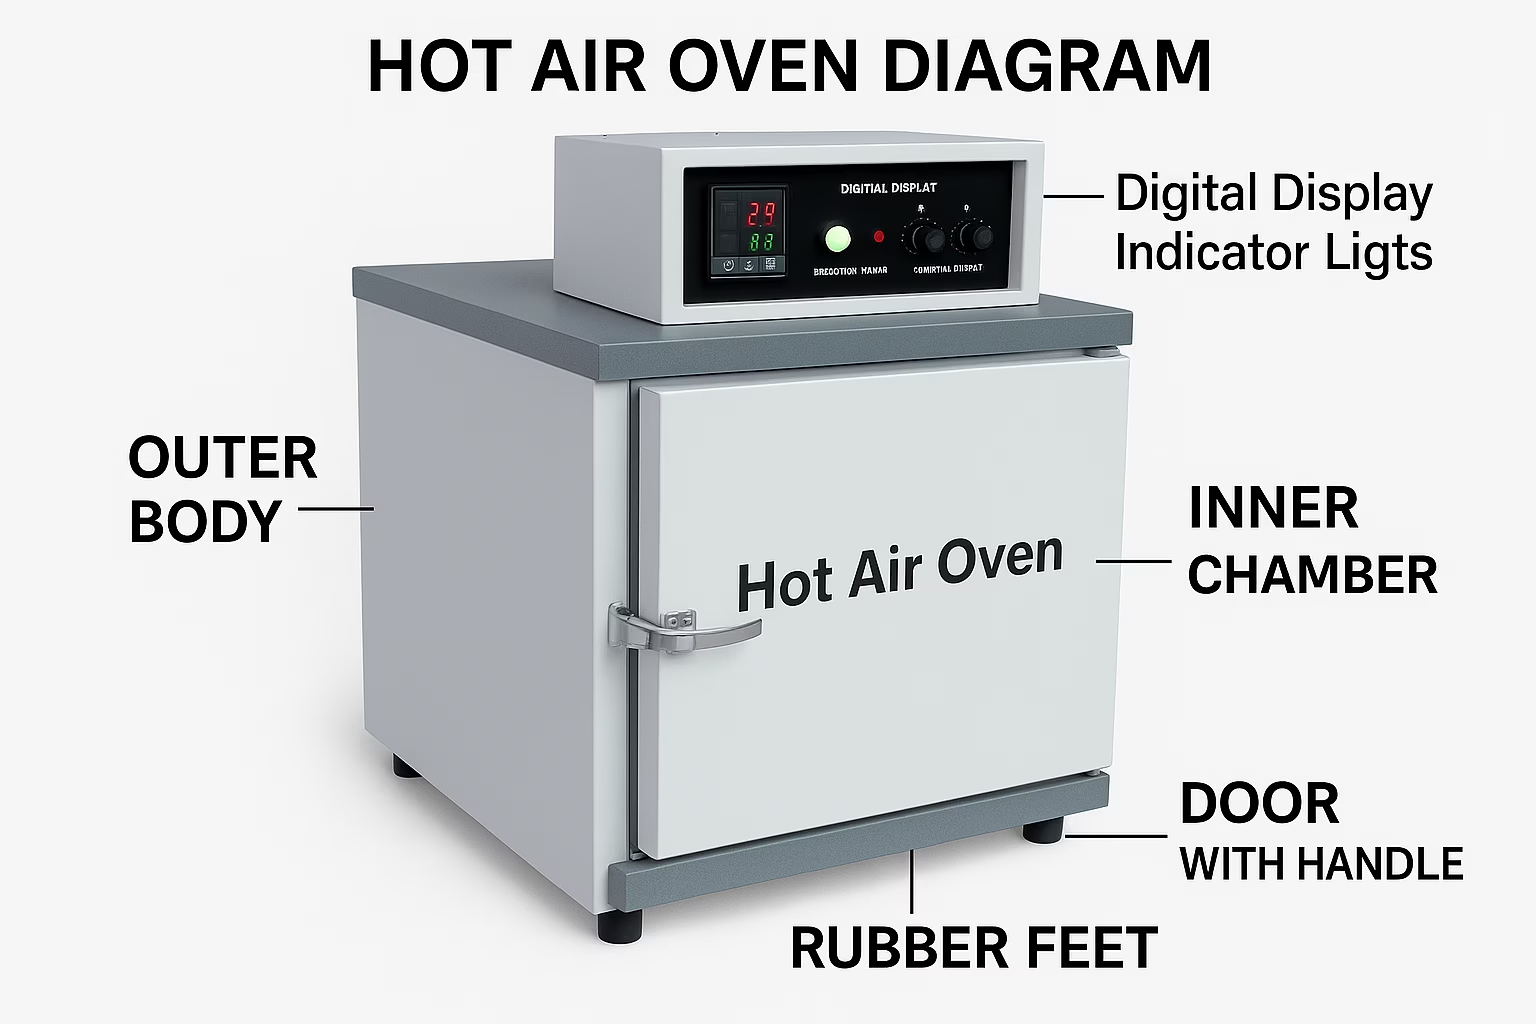
Working Principle:
-
A hot air oven works on the principle of dry heat sterilization, using hot air circulated at high temperatures.
-
Heat is generated by electric heating elements and distributed evenly inside the chamber.
-
The oven relies on convection currents or a fan to circulate hot air for uniform heating.
-
Sterilization is achieved by oxidation of cellular components, which kills microorganisms.
-
Typical sterilization is done at 160–180°C for 1–2 hours, depending on the material and load.
Uses:
-
Sterilization of glassware, metal instruments, and laboratory tools that can withstand dry heat.
-
Drying of laboratory glassware, slides, and other equipment.
-
Sterilization of powders, oils, and non-aqueous solutions.
-
Decontamination of laboratory materials before use.
-
Preparation of sterile containers and instruments for microbiology and biochemical experiments.
-
Heat sterilization of certain laboratory plastics (if heat-resistant).
Care:
-
Do not overload the oven; allow space for air circulation.
-
Ensure that all items are dry before placing them in the oven.
-
Keep the oven clean and free from dust or chemical spills.
-
Avoid touching hot surfaces; use heat-resistant gloves.
-
Monitor temperature settings to prevent overheating or burning of samples.
-
Keep the door closed during operation to maintain uniform temperature.
Maintenance:
-
Regularly clean the interior chamber and trays with mild detergent and water.
-
Inspect the door seal and hinges for proper function.
-
Check the heating elements periodically for damage or wear.
-
Calibrate the temperature controller or thermostat regularly for accuracy.
-
Keep a log of sterilization cycles, cleaning, and maintenance.
-
Ensure proper electrical supply and avoid voltage fluctuations.
-
Follow manufacturer’s preventive maintenance schedule for long-term reliability.
-
Ensure good ventilation around the oven to prevent overheating of electrical components.
Laminar Air Flow Cabinet 
Working Principle:
-
A laminar air flow cabinet provides a contamination-free workspace by directing HEPA-filtered air in a uniform laminar flow.
-
Air is drawn from the environment, passed through a pre-filter to remove large particles, and then through a HEPA filter to remove 99.97% of particles ≥0.3 µm.
-
The filtered air flows in a unidirectional, laminar stream across the work surface, sweeping away airborne contaminants.
-
The laminar flow can be horizontal (air flows from back to front) or vertical (air flows from top to bottom).
-
The cabinet is designed to protect samples and work materials from contamination; some models also provide operator protection.
Uses:
-
Preparation of sterile media, reagents, and culture plates.
-
Aseptic manipulation of microbial, cell, and tissue cultures.
-
Handling of biological samples to avoid contamination.
-
Preparation of solutions for molecular biology experiments (e.g., DNA/RNA work).
-
Pharmaceutical and clinical laboratories for sterile product preparation.
-
Research laboratories to maintain aseptic conditions during experiments.
Care:
-
Keep the cabinet clean and free from clutter to ensure smooth air flow.
-
Disinfect the work surface and interior with 70% ethanol before and after use.
-
Avoid blocking the air vents or HEPA filter.
-
Wear appropriate personal protective equipment (PPE) such as gloves and lab coats.
-
Work at least 6 inches inside the cabinet to maintain laminar flow integrity.
-
Avoid sudden movements or rapid hand motions that may disturb the laminar flow.
Maintenance:
-
Replace the HEPA filter periodically as per manufacturer recommendations or when air velocity drops.
-
Check the blower, fan, and motor for proper operation.
-
Inspect and clean pre-filters regularly to prevent dust accumulation.
-
Calibrate airflow velocity and ensure uniform laminar flow using anemometers.
-
Keep a maintenance log for cleaning, filter changes, and calibration.
-
Avoid storing chemicals, reagents, or equipment inside the cabinet permanently.
-
Ensure the electrical supply is stable and avoid overloading sockets.
-
Follow the manufacturer’s preventive maintenance schedule for long-term efficiency and safety.
Bunsen Burner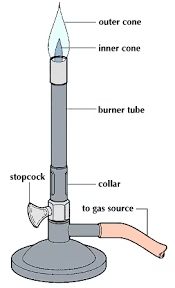
Working Principle:
-
A Bunsen burner works on the principle of combustion of gas (usually natural gas or liquefied petroleum gas) to produce a controlled flame.
-
Gas enters through the inlet tube and mixes with air through adjustable air holes to form a combustible mixture.
-
When ignited, the mixture burns to produce a flame whose temperature and intensity can be controlled by adjusting the gas flow and air supply.
-
The flame can be luminous (yellow, cooler, with less air) or non-luminous (blue, hotter, with more air), depending on the air-to-gas ratio.
-
The burner provides a high-temperature flame suitable for heating, sterilization, or combustion reactions in the laboratory.
Uses:
-
Heating chemicals or solutions in test tubes, beakers, or flasks.
-
Sterilization of inoculating loops, needles, or other small tools in microbiology.
-
Combustion reactions in chemistry experiments.
-
Demonstrations requiring flame, such as flame tests for metal ions.
-
Evaporation of small amounts of liquid in laboratory experiments.
-
Providing a controlled heat source for small-scale experiments.
Care:
-
Ensure the gas supply is turned off when the burner is not in use.
-
Place the burner on a stable, heat-resistant surface.
-
Avoid flammable materials near the flame.
-
Adjust the air and gas flow carefully to avoid excessive flame or backfire.
-
Never leave the burner unattended while lit.
-
Use proper lighting techniques with matches or a striker; avoid using hands near the flame.
Maintenance:
-
Inspect the gas inlet, hose, and burner tube for leaks or damage regularly.
-
Clean the burner tube to remove soot or blockages.
-
Check the air holes for debris and ensure smooth airflow.
-
Replace worn or damaged gas hoses immediately.
-
Ensure proper connection between the burner and gas source.
-
Keep a log of maintenance and inspections for safety.
-
Follow the manufacturer’s recommendations for preventive maintenance.
-
Ensure proper ventilation in the laboratory to avoid accumulation of gas.
Colony Counter
Working Principle:
-
A colony counter works on the principle of visual detection and counting of microbial colonies on agar plates.
-
It usually consists of a light source and a magnifying lens to illuminate and enlarge colonies.
-
Some colony counters are manual, using a marking pen to tally colonies.
-
Electronic or digital colony counters use a photodetector or camera system to detect and count colonies automatically.
-
The counter provides accurate enumeration of microbial colonies for quantitative analysis in microbiology.
Uses:
-
Counting bacterial or fungal colonies on agar plates in clinical, research, and industrial laboratories.
-
Estimation of microbial load in water, food, or pharmaceutical samples.
-
Monitoring growth of microorganisms in environmental and soil samples.
-
Quality control in food and beverage industries.
-
Evaluation of antibiotic efficacy by counting colonies in antimicrobial assays.
-
Standardization of microbial cultures for experiments.
Care:
-
Keep the colony counter clean and dust-free.
-
Avoid spilling samples or agar on the counting surface.
-
Handle plates carefully to prevent contamination or damage.
-
Use appropriate lighting and magnification to avoid eye strain.
-
Turn off the instrument when not in use to prolong lamp life (for illuminated models).
-
Avoid touching sensitive electronic parts with bare hands.
Maintenance:
-
Regularly clean the lens, stage, and light source with a soft cloth.
-
Replace bulbs or LEDs if illumination is dim.
-
Calibrate electronic counters periodically for accuracy.
-
Inspect the counting surface or stage for scratches or damages.
-
Keep a maintenance log including calibration, cleaning, and repairs.
-
Ensure stable electrical supply to prevent damage to electronic components.
-
Follow manufacturer guidelines for preventive maintenance and servicing.
-
For digital counters, update software if applicable to maintain counting accuracy.
Deep Freezer
Working Principle:
-
A deep freezer works on the principle of refrigeration using a vapor compression cycle.
-
The refrigerant absorbs heat from the interior compartment and releases it outside through a condenser.
-
The compressor circulates the refrigerant, maintaining low temperatures (usually −20°C to −80°C) inside the freezer.
-
Thermostats or digital controllers regulate the temperature to ensure stable storage conditions.
-
Uniform cooling and insulation prevent temperature fluctuations and preserve sample integrity.
Uses:
-
Long-term storage of biological samples such as blood, plasma, serum, and tissues.
-
Preservation of reagents, enzymes, and chemicals sensitive to temperature.
-
Storage of vaccines, microbial cultures, and DNA/RNA samples in research labs.
-
Maintaining temperature-sensitive pharmaceuticals and laboratory consumables.
-
Storage of food samples in food science laboratories.
Care:
-
Keep the freezer clean and free from ice buildup.
-
Avoid frequent opening of the door to maintain stable temperature.
-
Store samples in proper containers and avoid overloading.
-
Ensure adequate air circulation inside the freezer.
-
Use gloves when handling samples to prevent frostbite.
-
Keep the freezer away from direct sunlight or heat sources.
Maintenance:
-
Defrost periodically to remove ice accumulation.
-
Check door gaskets and seals for proper closure; replace if damaged.
-
Inspect compressor, condenser, and fans for proper operation.
-
Calibrate temperature controllers periodically for accuracy.
-
Keep a log of temperature readings, maintenance, and service.
-
Ensure stable electrical supply; use voltage stabilizers if necessary.
-
Clean condenser coils to maintain efficiency.
-
Follow manufacturer’s preventive maintenance schedule to prolong freezer life.
Water Distiller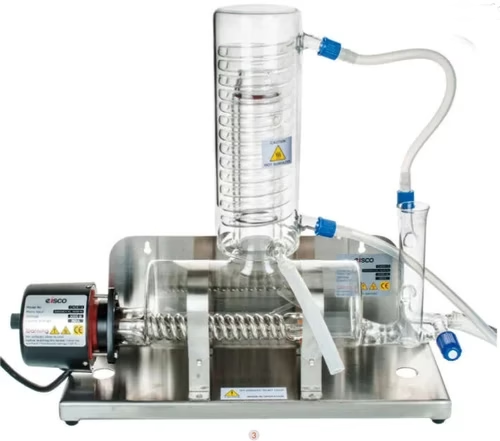
Working Principle:
-
A water distiller works on the principle of distillation, separating water from impurities based on differences in boiling points.
-
Water is heated in a boiling chamber to produce steam, leaving behind dissolved salts, minerals, and contaminants.
-
The steam passes through a condenser, where it is cooled and converted back into purified water.
-
The distilled water is collected in a separate container, free from most chemical and microbial contaminants.
-
Some water distillers include activated carbon filters to remove odors or trace impurities after condensation.
Uses:
-
Preparation of distilled water for laboratory experiments and reagent preparation.
-
Sterile water for injections, culture media, and chemical solutions.
-
Use in analytical instruments (e.g., spectrophotometers, pH meters) to avoid contamination.
-
Preparation of buffers, dilutions, and standard solutions.
-
General laboratory use where high-purity water is required.
-
Cleaning or rinsing laboratory glassware to prevent residues.
Care:
-
Use clean, preferably tap water, free from large particulates for distillation.
-
Regularly clean the boiling chamber to remove scale or mineral deposits.
-
Avoid overfilling the chamber to prevent water spillage or damage.
-
Handle the unit carefully to avoid burns from hot surfaces or steam.
-
Keep the collection container clean and covered to prevent contamination.
-
Operate the distiller in a well-ventilated area to avoid excessive humidity accumulation.
Maintenance:
-
Descale the boiling chamber regularly using mild acids or manufacturer-recommended descaling solutions.
-
Clean or replace post-filters (if included) periodically.
-
Inspect heating elements for proper operation and signs of corrosion.
-
Check electrical connections and power supply to prevent short circuits or damage.
-
Keep a log of cleaning, descaling, and maintenance activities.
-
Follow manufacturer guidelines for preventive maintenance and servicing.
-
Ensure proper cooling of the condenser to maintain efficiency.
-
Store the distiller in a dry and dust-free area when not in use.