Introduction
- A polarizing microscope is a specialized optical instrument used to observe and analyze specimens that exhibit birefringence or anisotropic properties.
- These materials have structures that split light into two rays, travelling at different velocities, revealing unique optical characteristics.

- Polarizing microscopes are invaluable in geology, biology, chemistry, material science, and forensics, where understanding internal material structures is essential.
History
- The concept of polarized light microscopy dates back to the early 19th century.
- In 1828, William Nicol invented the Nicol prism, a device that could polarize light, paving the way for studying birefringent materials.
- Later, improvements by Ernst Abbe and August Köhler refined microscope optics and illumination techniques, leading to the sophisticated instruments used today.
- Polarizing microscopy remains crucial for identifying minerals, analyzing material stress patterns, and exploring biological specimens.
Working Principle
A polarizing microscope works by using polarized light to examine materials. The principle revolves around light polarization — where light waves oscillate in a single plane. The microscope uses two key optical components:
- Polarizer: Positioned below the specimen, this component filters light to vibrate in a single plane before reaching the sample.
- Analyzer: This element acts as a second polarizer above the specimen. It filters the light emerging from the sample, allowing only the light altered by the specimen’s birefringent properties to pass through. When the polarizer and analyzer are set perpendicular to each other (crossed polars), regions of the sample that affect light propagation become visible, often producing vibrant interference colours or distinctive extinction patterns.
When birefringent materials are viewed, the difference in refractive indices causes a phase shift in the light waves, generating interference colours depending on the material’s thickness, optical path difference, and wavelength of light used.
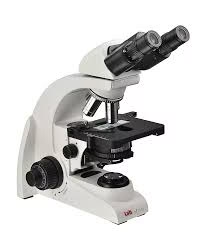
Parts of a Polarizing Microscope
- Light Source: Provides stable illumination, typically through halogen or LED lamps. Some microscopes have adjustable brightness.
- Polarizer: Positioned before the condenser, it polarizes the light before interacting with the specimen.
- Condenser: Focuses light onto the sample to provide even illumination. Some condensers have built-in aperture diaphragms to control contrast.
- Rotating Stage: Holds the sample and can rotate, allowing observation of how light interacts with the sample from different angles. The stage usually has degree markings for precise angle measurements.
- Objective Lenses: High-quality, strain-free lenses designed to minimize internal birefringence, providing accurate images.
- Analyzer: A second polarizer located in the optical path after the sample is used to analyze the light that has passed through the specimen.
- Compensators/Retardation Plates: Accessories like quartz wedges or gypsum plates are inserted into the optical path to measure optical path differences or enhance contrast.
- Eyepiece/Camera: Allows direct observation or digital capture of the image for documentation or further analysis.
Maintenance:
- Cleaning Optics: Regularly clean lenses, polarizers, and prisms with lens paper and optical cleaning solutions to prevent debris and oil buildup.
- Calibration: Periodically calibrate the rotating stage and objective lenses to ensure precise angle measurements.
- Light Source Care: Monitor the bulb or LED life span, replace as necessary, and avoid excessive heat exposure.
- Mechanical Care: Lubricate mechanical components, like the rotating stage and focus knobs, to ensure smooth movement.
- Storage: Store in a dust-free, low-humidity environment, and cover the microscope when not in use to protect delicate components.
Applications:
- Geology & Mineralogy: Identifying minerals, studying rock thin sections, and determining crystal structures.
- Biology: Examining cell walls, mitotic spindles, and muscle fibres to understand cellular structures.
- Material Science: Analyzing stress patterns in materials like glass and polymers or studying composite materials’ internal structures.
- Pharmacology: Investigating the crystallinity of drugs to understand polymorphism and bioavailability.
- Forensics: Analyzing hair fibres, textile materials, and trace evidence in criminal investigations.
- Petrography: Studying the optical properties of rocks and minerals to determine their formation conditions.
Advantages:
- Provides high-contrast images of birefringent materials.
- Allows precise measurements of optical properties (e.g., birefringence, optical path difference).
- Enables non-destructive analysis of delicate samples.
- Useful for both qualitative observations and quantitative data collection.
- Reveals internal structural details invisible under standard brightfield microscopy.
Disadvantages and Limitations:
- Limited to anisotropic (birefringent) materials, isotropic samples show little to no contrast.
- High-quality instruments and accessories (like compensators) can be expensive.
- Requires technical knowledge to interpret interference patterns accurately.
- Sample preparation can be complex (e.g., thin-sectioning minerals or mounting specimens).
- Polarizing components may degrade over time, requiring periodic replacement or refurbishment.