
Introduction
-
Blood sample collection is a vital procedure in laboratory medicine for diagnosing, monitoring, and predicting diseases.
-
The accuracy of laboratory results depends greatly on the quality of the collected blood specimen.
-
It is performed by trained healthcare professionals who follow standardized techniques.
-
Aseptic methods are used during the procedure to prevent contamination and infection.
-
Proper patient preparation, including identification and checking fasting status, is essential.
-
Blood collection forms a major part of the pre-analytical phase where most errors can occur, making correct technique crucial.
Types of Blood Sample Collection
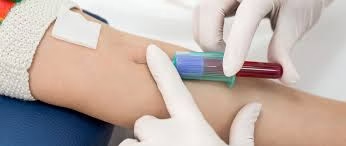
a) Venous Blood Collection
-
Most commonly used method
-
Collected from the median cubital, cephalic, or basilic veins
-
Used for serum chemistry, hematology, immunology, microbiology, and specialized assays
b) Capillary Blood Collection
-
Taken from fingertip (adults) or heel (infants)
-
Useful in glucose testing, neonatal screening, POCT (Point-of-Care Testing)
c) Arterial Blood Collection
-
Performed for arterial blood gas (ABG) analysis
-
Requires expertise due to higher risk
Preparation for Blood Collection
Identify the Patient
- Verify patient identity using at least two identifiers, such as:
- Full name
- Date of birth
- Patient identification number
- Explain the procedure to the patient to obtain verbal consent and address any concerns they may have.
Patient Preparation
Proper preparation ensures accurate and reproducible results:
-
Confirm patient identity (two-step verification)
-
Explain the procedure to reduce anxiety
-
Check for fasting requirements
-
Assess hydration status
-
Avoid sample collection from IV infusion arm
-
Ensure patient is seated or lying down
Equipment for sample collection
Ensure all necessary materials are prepared before starting the procedure:
- Vacutainer tubes (correct type based on the tests required)
- Needles (typically 21 or 22 gauge for adults)
- Tourniquet
- Alcohol swab or antiseptic
- Sterile gauze or cotton
- Adhesive bandage
- Gloves
- Sharps container for needle disposal
- Labels for the tubes (with patient information)
Choose the Collection Site
Skin puncture

Skin puncture, or capillary blood collection, is a common technique to obtain small amounts of blood for various tests. This method is often preferred for infants, children, or individuals with limited access to veins.
Steps Involved in Skin Puncture:
- Preparation:
- Gather necessary materials: sterile lancets, alcohol swabs, cotton balls, bandages, and appropriate collection tubes or devices.
- Ensure the patient is comfortable and informed about the procedure.
- Site Selection:
- Choose a suitable site, typically the fingertip or heel, for infants.
- Clean the area with alcohol and allow it to dry completely.
- Puncture:
- Use a sterile lancet to make a shallow puncture. Avoid going too deep to prevent tissue damage.
- Gently squeeze the area to encourage blood flow.
- Blood Collection:
- Place the collection device against the puncture site to collect the blood.
- Follow any specific instructions provided by the laboratory or test kit.
- Site Care:
- Apply pressure to the puncture site with a cotton ball until the bleeding stops.
- Cover the site with a bandage if necessary.
Precautions and Considerations:
- Sterility: Maintain a sterile environment to prevent infection.
- Depth: Avoid puncturing too deeply, which can cause pain and tissue damage.
- Pressure: Excessive pressure can hemolyze (rupture) red blood cells, affecting test results.
- Volume: Ensure sufficient blood is collected for the required tests.
- Consent: Obtain consent from the patient or guardian, especially for children.
Vein puncture
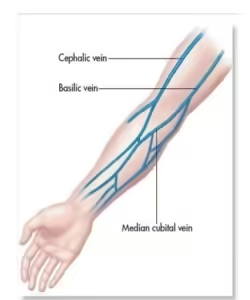
Common Sites:
-
- The antecubital fossa (inner elbow) is the most common area, with veins like the median cubital, cephalic, and basilic veins being preferred.
- In some cases, veins in the dorsal hand or wrist may be used if the arm veins are difficult to access.
Steps for Venipuncture
Position the Patient
- Have the patient sit or lie down with their arm extended on a flat surface.
- Ensure the patient’s arm is relaxed and supported, with the palm facing upward.
Apply the Tourniquet
- Apply the tourniquet 3-4 inches above the puncture site to engorge the veins.
- The tourniquet should not be left on for more than 1 minute to avoid hemoconcentration, which can affect test results.
Select the Vein
- Palpate the vein using your fingertips to feel for a firm, round, and elastic vein.
- Veins are typically easier to locate in well-hydrated patients.
Clean the Site
- Clean the selected puncture site with an alcohol swab in a circular motion, starting from the center and working outward.
- Allow the area to air-dry to avoid introducing alcohol into the sample.
Insert the Needle
- Put on gloves to maintain an aseptic technique.
- Uncap the needle and hold it at a 15-30° angle with the bevel facing up.
- Insert the needle into the vein with a smooth, quick motion. The needle should enter with a slight downward angle.
Collect the Sample
- Attach the appropriate vacutainer tube to the needle holder to collect blood.
- Order of Draw: Blood should be drawn in a specific sequence to avoid contamination between additives in different tubes. The typical order of draw is:

- Blood culture tubes (yellow or special bottles)
- Citrate tubes (light blue top)
- Serum tubes (red or gold top)
- Heparin tubes (green top)
- EDTA tubes (lavender top)
- Fluoride/oxalate tubes (gray top)
- Gently invert the tubes 5-10 times after collection to mix the blood with the anticoagulant or preservative.
- Avoid shaking to prevent hemolysis.
Release the Tourniquet
- Release the tourniquet once blood flow is established to prevent prolonged pressure on the vein, which can cause hemolysis or tissue damage.
Remove the Needle
- After collecting the required blood volume, carefully remove the needle while applying light pressure to the site with sterile gauze or cotton.
- Dispose of the needle immediately into a sharp container.
Apply Pressure and Bandage
- Apply firm pressure to the puncture site using sterile gauze for 1-2 minutes to stop bleeding.
- Once the bleeding has stopped, apply an adhesive bandage.
Post-Collection Procedure
Label the Tubes
- Immediately label each collection tube with the patient’s:
- Full name
- Date of birth
- Time and date of collection
- Test(s) requested
- Ensure the information on the tubes matches the patient’s identification.
Transport and Storage
- Store and transport the samples according to the specific requirements of the tests:
- Room temperature for most haematological and coagulation studies.
- Refrigeration at 4°C for some samples (e.g., blood gases or specific chemistry tests).
- Avoid exposing samples to excessive heat or freezing, which can affect the integrity of certain blood components.
Documentation
- Document the procedure in the patient’s medical record, including:
- The date and time of collection
- The collection site
- The type of test ordered
- Any issues encountered during the collection process
Common Errors and Precautions
Hemolysis
- Cause: Vigorous shaking of tubes, using a small-gauge needle, or prolonged tourniquet application.
- Effect: This can lead to inaccurate test results like potassium levels, LDH, and haemoglobin.
Contamination
- Cause: Not following the proper drawing order, reusing needles, or improper cleaning of the puncture site.
- Effect: Can introduce additives from one tube into another, leading to inaccurate results (e.g., false elevated potassium in a serum sample).
Clotting in Anticoagulated Samples
- Cause: Failure to invert tubes with anticoagulant properly.
- Effect: Leads to clotting of the sample, rendering it unsuitable for haematological testing.
Fainting (Syncope)
- Precaution: Always monitor the patient for signs of fainting or dizziness during and after the procedure.
- Have the patient seated or lying down during collection to prevent falls.
Collection & Preservation for Specific Hematological Investigations
Complete Blood Count (CBC)
Test Description: Measures various blood components, including RBC count, WBC count, haemoglobin, hematocrit, and platelet count.
- Tube Type: EDTA (Lavender Top)
- Anticoagulant: Ethylenediaminetetraacetic acid (EDTA).
- Mode of Action: EDTA chelates calcium, preventing clotting and preserving cellular morphology.
- Sample Handling:
- Ensure gentle mixing of the blood with the anticoagulant by inverting the tube 8-10 times immediately after collection.
- Avoid vigorous shaking, which can cause hemolysis (rupture of red blood cells).
- Storage:
- Room temperature: Stable for up to 6 hours for routine CBC tests.
- Refrigeration (4°C): Can preserve samples for up to 24 hours for most parameters but may affect some cell counts like platelets.
Coagulation Studies (e.g., PT, aPTT)
Test Description: Assesses blood clotting times to detect deficiencies in the clotting factors or monitor anticoagulant therapy (e.g., warfarin, heparin).
- Tube Type: Sodium Citrate (Light Blue Top)
- Anticoagulant: 3.2% Sodium Citrate.
- Mode of Action: Binds calcium reversibly, preventing coagulation.
- Sample Handling:
- The blood-to-anticoagulant ratio must be 9:1 (blood) to ensure accurate test results.
-
- Fill the tube to the marked level to maintain the correct anticoagulant ratio.
- Storage:
- Room temperature: Analyze samples within 2-4 hours for accurate coagulation results.
- Refrigeration: Not recommended, as it can activate clotting factors and skew results.
Erythrocyte Sedimentation Rate (ESR)
Test Description: Measures the rate at which red blood cells settle in a column of blood, which can indicate inflammation or infection.
- Tube Type: Sodium Citrate (Black Top) or EDTA (Lavender Top).
- Anticoagulant: Sodium Citrate (for ESR tubes) or EDTA.
- Sample Handling:
- Gently invert the tube several times to ensure proper mixing of blood and anticoagulant.
- Storage:
- Room temperature: Analyze within 2 hours.
- Refrigeration (4°C): Samples can be stored for up to 24 hours, but allow the sample to return to room temperature before analysis.
Blood Smear for Peripheral Blood Film
Test Description: Used to examine blood cell morphology and detect abnormalities in RBCs, WBCs, and platelets.
- Tube Type: EDTA (Lavender Top).
- Sample Handling:
- Prepare the smear within 2-3 hours of collection to avoid changes in cell morphology (e.g., red cell crenation or WBC degradation).
- Smears should be air-dried quickly and fixed with methanol for staining.
- Storage:
- Room temperature: Prepare smears immediately; store the slides at room temperature once prepared.
Reticulocyte Count
Test Description: Measures immature red blood cells (reticulocytes) to assess bone marrow function and the body’s response to anaemia.
- Tube Type: EDTA (Lavender Top).
- Sample Handling:
- Gently invert the tube to ensure proper mixing with the anticoagulant.
- Process the sample within 4-6 hours for best results.
- Storage:
- Room temperature: Stable for up to 6 hours.
- Refrigeration (4°C): Samples can be stored for up to 24 hours.
Bone Marrow Aspiration
Test Description: Used to diagnose hematologic disorders like leukaemia, anaemia, and myelodysplastic syndromes.
- Tube Type: EDTA (Lavender Top) or Heparin (Green Top) for certain cytogenetic tests.
- Sample Handling:
- Bone marrow aspirates should be processed immediately for smear preparation.
- If cytogenetic analysis is required, collect in heparinized tubes to preserve cell viability.
- Storage:
- Room temperature: Smears should be prepared as soon as possible after collection.
Sample Preservation and Storage Conditions
Refrigeration (4°C):
- Used for short-term preservation of most haematology samples (except coagulation tests).
- Extends the stability of cell morphology and certain analytes, especially for tests like CBC and reticulocyte count.
Freezing:
- Not recommended for whole blood samples, as it can lead to hemolysis and cellular damage.
- Some components, like plasma for coagulation studies, may be frozen if separated from cells.
Room Temperature:
- For tests like coagulation studies, ESR, and blood smears, samples should generally be processed within 2-4 hours of collection.
Avoiding Hemolysis:
- Hemolysis can occur due to improper handling (e.g., vigorous shaking, small-gauge needle use, or excessive force during venipuncture).
- Hemolysis can interfere with tests, leading to inaccurate results, particularly in tests like potassium levels, LDH, and haemoglobin.
MCQs
-
Which vein is most commonly used for venipuncture?
A. Basilic vein
B. Cephalic vein
C. Median cubital vein
D. Femoral vein -
What is the first step before collecting any blood sample?
A. Apply tourniquet
B. Clean the site
C. Identify the patient
D. Insert the needle -
Which color tube is used for CBC testing?
A. Red
B. Lavender
C. Blue
D. Yellow -
The lavender-top tube contains:
A. Heparin
B. EDTA
C. Sodium fluoride
D. Citrate -
Which tube is used for coagulation studies (PT, APTT)?
A. Red
B. Blue
C. Green
D. Grey -
Which anticoagulant prevents clotting by binding calcium?
A. EDTA
B. Heparin
C. Thrombin
D. Polymer gel -
Capillary blood is usually collected from which site in adults?
A. Toe
B. Ear lobe
C. Finger
D. Heel -
Capillary blood in infants is collected from:
A. Finger
B. Heel
C. Wrist
D. Forearm -
What is the ideal angle for inserting a needle in venipuncture?
A. 15–30°
B. 45–60°
C. 75–90°
D. 5–10° -
The order of draw begins with:
A. EDTA tubes
B. Coagulation tubes
C. Blood culture bottles
D. Serum tubes -
Which factor can cause hemolysis during collection?
A. Using a large-bore needle
B. Gentle mixing
C. Vigorous shaking of tube
D. Correct storage -
Tourniquet should not be applied for more than:
A. 10 seconds
B. 20 seconds
C. 60 seconds
D. 5 minutes -
Which needle size is commonly used in adult venipuncture?
A. 16G
B. 18G
C. 21–23G
D. 30G -
Which of the following may lead to a falsely elevated potassium level?
A. Hemolysis
B. Using EDTA tube
C. Delayed centrifugation
D. All of the above -
The grey-top tube contains:
A. Fluoride + oxalate
B. EDTA
C. Heparin
D. No additive -
Which sample is required for blood glucose estimation?
A. Serum
B. EDTA blood
C. Fluoride plasma
D. Citrated blood -
The process of removing serum from a clotted sample is called:
A. Coagulation
B. Plasma separation
C. Serum separation
D. Decanting -
Syncope refers to:
A. Bleeding
B. Fainting
C. Infection
D. Hemolysis -
Which antiseptic is commonly used before blood collection?
A. Phenol
B. Spirit + iodine
C. Turpentine
D. Silver nitrate -
For blood culture, the skin must be cleaned with:
A. Soap
B. 70% alcohol only
C. Chlorhexidine
D. Normal saline -
Which sample is preferred for ESR (Westergren method)?
A. Heparinized blood
B. Citrated blood
C. Serum
D. Fluoride blood -
Hemoconcentration is caused by:
A. Prolonged tourniquet application
B. Short tourniquet application
C. Using small needle
D. Low temperature -
How many times should an EDTA tube be inverted after collection?
A. 1–2 times
B. 8–10 times
C. 20 times
D. Shake vigorously -
Which is the safest method to dispose of used needles?
A. Break manually
B. Recap the needle
C. Discard in puncture-proof container
D. Throw in dustbin -
Which tube gives a serum sample?
A. Red-top
B. Lavender
C. Green
D. Grey -
Plasma differs from serum because it contains:
A. Red cells
B. Fibrinogen
C. Platelets
D. Water -
Which factor increases the risk of hemolysis?
A. Cold storage
B. High pressure during blood withdrawal
C. Using vacuum tubes
D. Correct needle angle -
Which specimen is required for arterial blood gas (ABG)?
A. Venous blood
B. Capillary blood
C. Arterial blood
D. Serum -
The most common artery used for ABG collection:
A. Carotid artery
B. Ulnar artery
C. Radial artery
D. Femoral artery -
Before radial artery puncture, which test is performed?
A. Coagulation test
B. Allen’s test
C. Hemoglobin test
D. ESR test -
Which additive prevents clotting by inhibiting thrombin?
A. EDTA
B. Citrate
C. Heparin
D. Fluoride -
Ideal position for the patient during venipuncture:
A. Standing
B. Lying or sitting comfortably
C. Running
D. Leaning forward -
What should be done if a hematoma develops during collection?
A. Continue collection
B. Apply pressure and stop
C. Insert needle deeper
D. Change nothing -
Which factor affects blood test results?
A. Fasting
B. Exercise
C. Stress
D. All of the above -
Which tube should be filled completely to maintain correct ratio?
A. EDTA
B. Citrate (blue-top)
C. Fluoride
D. Heparin
Answer Key
-
C
-
C
-
B
-
B
-
B
-
A
-
C
-
B
-
A
-
C
-
C
-
C
-
C
-
D
-
A
-
C
-
C
-
B
-
B
-
C
-
B
-
A
-
B
-
C
-
A
-
B
-
B
-
C
-
C
-
B
-
C
-
B
-
B
-
D
-
B