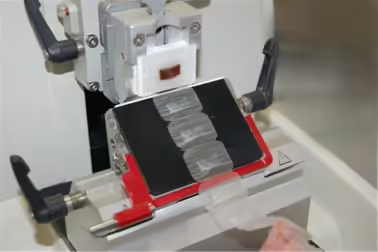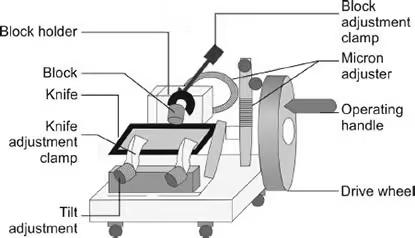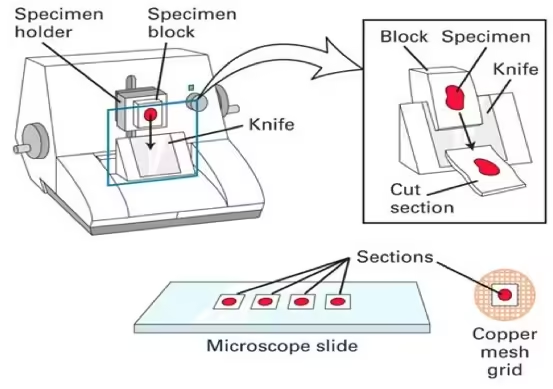
The success of microtome sectioning depends on both technique and equipment. Below is an in-depth look at practical section cutting, common cutting faults, and how to address them to achieve consistently high-quality sections.
Practical Section Cutting
Achieving precise, thin sections suitable for microscopy requires careful control over each step, from specimen preparation to microtome operation.
-
Specimen Preparation:

- Embedding Medium Choice: Paraffin is commonly used for soft biological tissues, while resin is better for harder tissues like bone. Ensure the medium is compatible with the microtome knife and the type of microscopy being conducted.
- Trimming and Shaping: The block should be evenly trimmed into a trapezoid or rectangle with a smooth face. Uneven trimming can create irregular cuts and place uneven pressure on the blade.
- Optimal Block Temperature: Soft blocks are easier to compress and deform, so aim to cut paraffin-embedded blocks at 15-20°C. Use a cooling plate if necessary to achieve this.
- Orientation of Specimen: Position the specimen so the area of interest is parallel to the blade edge. This minimizes the chance of uneven cuts and ensures that all critical areas are included in each section.
-
Microtome and Knife Setup:
- Clearance Angle: Typically set between 3-10 degrees. Harder specimens require a lower angle (closer to 3 degrees), while softer tissues can tolerate a higher angle.
- Section Thickness: Ensure uniformity in thickness, with thinner sections (3-5 µm) for light microscopy and ultrathin sections (50-100 nm) for electron microscopy. Variations in thickness lead to artifacts like compression or chatter.
- Knife Position and Stability: Secure the blade tightly in the holder and ensure it is parallel to the block. Loose knives cause vibrations, leading to uneven cuts.
-
Sectioning Technique:
- Consistent Motion: Operate the microtome with a steady hand. Sudden jerks or variations in pressure can lead to section faults.
- Angle of Approach: Approach the specimen slowly and steadily to avoid damaging the section surface.
- Ribbon Collection: Collect ribbons gently using a soft brush or tweezers and transfer them to a water bath at around 40-45°C to smoothen and flatten the sections.
Analysis of Cutting Faults, Causes, and Remedies
-
Compression Artifacts:
- Description: Sections appear wrinkled or compressed, with visible distortions.
- Causes:
- Overly high clearance angle, leading to crushing.
- Dull blade or incorrect section thickness for the specimen type.
- Remedies:
- Angle Adjustment: Lower the clearance angle incrementally and retest.
- Knife Sharpening: Check for dullness and resharpen if necessary.
- Section Thickness: For softer specimens, reduce thickness (e.g., 4-5 µm for paraffin-embedded tissues).
-
Chatter Marks (Venetian Blind Effect):

- Description: Fine, horizontal striations appear across the section, resembling a “Venetian blind” pattern.
- Causes:
- Vibrations from a loose knife or specimen block.
- Hard specimen or embedding medium, resulting in resistance to cutting.
- Excessive clearance angle.
- Remedies:
- Secure Setup: Ensure the block and knife are tightly fastened in the microtome.
- Adjust Hardness: If the block is hard, allow it to equilibrate to room temperature or, if possible, soften it slightly.
- Angle Modification: Lower the clearance angle to reduce blade contact resistance and ensure steady movement.
-
Knife Lines and Scratches:
- Description: Fine, linear marks across sections, often from nicks on the knife edge.
- Causes:
- Chips, nicks, or particles on the knife edge.
- Remedies:
- Inspect Knife: Use a magnifier to check for visible imperfections.
- Replace or Resharpen: If significant wear is present, a knife with nicks should be resharpened or replaced.
- Clean Thoroughly: Remove debris from the blade edge with a soft, lint-free cloth before sectioning.
-
Sections Not Forming a Ribbon:
- Description: Sections do not adhere to one another, falling off individually instead.
- Causes:
- Incorrect clearance angle or inadequate humidity in the lab.
- Improper block temperature, leading to a brittle block face.
- Remedies:
- Adjust Angle: Fine-tune the clearance angle to create smoother, more cohesive ribbons.
- Check Humidity and Temperature: Increase humidity or warm the block face slightly if it’s too cold, allowing sections to adhere naturally.
-
Holes or Voids in Sections:
- Description: Small holes appear within the section, disrupting continuity.
- Causes:
- Air bubbles in the embedding medium or knife edge are too sharp for the specimen density.
- Remedies:
- Embedding Technique: Ensure proper embedding without air pockets; apply slight pressure to displace air before solidifying.
- Knife Adjustment: Use a lower clearance angle or opt for a less sharp blade for soft specimens that may tear easily.
-
Distorted or Stretched Sections:
- Description: Sections are unevenly stretched, with distorted morphology.
- Causes:
- Temperature fluctuations across the block or variable pressure applied during sectioning.
- Remedies:
- Consistent Technique: Apply even pressure when cutting and avoid abrupt movements.
- Uniform Temperature: Maintain block temperature stability throughout the cutting process.
-
Alternating Thick and Thin Sections:
- Description: The ribbon shows alternate thick and thin sections, leading to uneven transparency.
- Causes:
- Inconsistent cutting speed or blade sharpness.
- Remedies:
- Blade Condition: Check and resharpen if the edge appears unevenly sharp.
- Consistent Motion: Practice a steady, uniform cutting speed to produce even sections.
-
Wrinkled Sections:
- Description: Sections contain folds or wrinkles, causing irregular shapes.
- Causes:
- Soft or warm block or a dull knife edge.
- Remedies:
- Proper Temperature: Cool the block to an appropriate temperature for cutting.
- Sharpen Knife: A sharp knife minimizes the risk of wrinkling.
-
Incomplete or Partial Sections:
- Description: Portions of the section are missing, leaving an irregular surface.
- Causes:
- Inconsistent contact between the blade and specimen or improper trimming.
- Remedies:
- Angle and Trimming: Readjust the angle and re-trim the block surface for uniform contact with the knife.
Preventative Measures and Advanced Tips
- Routine Knife Maintenance:
- Regularly sharpen knives to ensure consistent edge quality. Implement a cleaning routine to remove any residue after each use.
- Control Environmental Conditions:
- Temperature and Humidity: Maintain a stable lab environment, as fluctuations affect specimen integrity and cutting ease. For paraffin blocks, a cooler room prevents premature melting.
- Knife and Microtome Calibration:
- Routinely check microtome settings and ensure the knife holder, specimen clamp, and blade angle are aligned and secure.
- Specimen-Specific Adjustments:
- Different materials require slight adjustments in cutting angle and pressure. For instance, softer specimens benefit from a higher clearance angle and lower section thickness, while harder materials may need lower angles and specific knife profiles.
- Practice and Technique Development:
- Experienced microtome users develop an intuitive feel for ideal cutting speeds, angles, and pressures. Routine practice and careful attention to detail help hone this skill, reducing the occurrence of sectioning errors.