AIM: Determination of Hemoglobin
Principle of Sahli’s method
- When blood is added to 0.1 N hydrochloric acid, hemoglobin is converted to brown colored acidhematin.
- The resulting colour after dilution is compared with standard brown glass reference blocks of a Sahli hemoglobinometer.
Materials Required
- Blood Sample: EDTA or Fresh venous blood.
- Reagents:
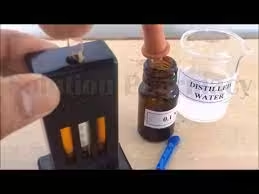
- Hydrochloric Acid (HCl): Concentration of about 0.1 N.
- Distilled Water: For dilution and washing.
- Glassware:
- Test tubes
- Pipettes
- A graduated cylinder
- Hemoglobinometer
- Colour Comparison Chart: A device or printed chart to compare the colour of the hemolysate against known standards.
Procedure
Step 1: Preparation of Blood Sample
- Collect the Blood:
- Collect venous blood into a clean test tube or container using an aseptic technique.
- If using an anticoagulant (like EDTA), ensure the blood remains fluid for accurate measurement.
Step 2: Hemolysis of Red Blood Cells
- Add Hydrochloric Acid:
- Measure about 2 mL of blood and transfer it to a test tube.
- Carefully add 2-3 drops of 0.1 N hydrochloric acid to the blood sample. This acid will lyse the red blood cells, releasing haemoglobin into the solution.
- Mix the Solution:
- Gently invert the test tube or mix the blood and acid solution with a pipette.
- Allow the mixture to stand at room temperature for 5-10 minutes. The solution will turn red as the haemoglobin is released and dissolved.
Step 3: Preparation of the Standard
- Prepare a Standard Solution:
- If a standard solution is unavailable, prepare a standard haemoglobin solution with a known concentration (e.g., 15 g/dL).
- This can be done by dissolving a specific amount of purified haemoglobin in distilled water to create a colour standard for comparison.
Step 4: Color Comparison
- Dilution (if necessary):
- If the hemolysate is too concentrated, dilute it with distilled water to achieve a suitable concentration for comparison. The typical dilution ratio is about 1:10, but this can be adjusted based on the depth of colour.
- Use a Second Test Tube:
- Transfer an equal volume (2 mL) of the standard haemoglobin solution into a separate test tube for comparison.
- Comparison of Colors:
- Place both test tubes (the hemolysate and the standard solution) against a white background or light source to enhance visibility.
- Compare the colour of the hemolysate with the standard solution or colour comparison chart. Look for the closest match in colour intensity.
Step 5: Interpretation of Results
- Record the Hemoglobin Level:
- Based on the comparison, estimate the haemoglobin concentration in the blood sample. The concentration is typically expressed in grams per deciliter (g/dL).
- Use the colour intensity of the hemolysate to determine the haemoglobin level by referencing the standard.
Advantages
- Simple and Cost-Effective: Requires minimal equipment and can be performed in basic laboratory settings.
- Quick Procedure: Results can be obtained relatively quickly.
Disadvantages
- Subjective Measurement: Color comparison can be affected by lighting conditions and personal interpretation, leading to potential inaccuracies.
- Limited Precision: Less accurate than advanced methods, especially in hemoglobinopathies or abnormal haemoglobin forms.
- Interferences: Other blood components can influence the colour, impacting the accuracy of the results.
Principle of the Cyanmethemoglobin Method
- The Cyanmethemoglobin method is based on converting haemoglobin (Hb) in the blood to a stable, coloured complex known as cyanmethemoglobin.
- This conversion occurs through the action of specific reagents, primarily potassium ferricyanide and potassium cyanide.
Materials Required
- Reagents:
- Drabkin’s Solution: A mixture containing:
- Potassium ferricyanide (K₃[Fe(CN)₆]): Converts haemoglobin to cyanmethemoglobin.
- Potassium cyanide (KCN): Stabilizes the cyanmethemoglobin complex.
- Distilled Water
- Drabkin’s Solution: A mixture containing:
- Glassware:
- Test tubes.
- Pipettes (for accurate measurement of liquids).
- Cuvettes (for spectrophotometric measurement).
- Spectrophotometer: For measuring the absorbance at a specific wavelength (540 nm).
- Standard Haemoglobin Solution: For calibration and comparison.
Procedure
Step 1: Preparation of Blood Sample
- Collect the Blood:
- Use an aseptic technique to collect venous blood into a clean test tube containing an anticoagulant (like EDTA) to prevent clotting.
Step 2: Preparation of Hemolysate
- Add Drabkin’s Solution:
- Measure 5 mL of Drabkin’s solution and add it to a test tube.
- Add 20 µL (0.02 mL) of the blood sample to the Drabkin solution test tube.
- Mix the Solution:
- Mix the solution by inverting the test tube or using a vortex mixer to ensure thorough mixing. This process lyses the red blood cells and converts haemoglobin to cyanmethemoglobin.
- Allow Reaction to Occur:
- Let the mixture stand for 10-15 minutes at room temperature. This allows for the complete conversion of haemoglobin to cyanmethemoglobin.
Step 3: Measurement
- Set Up the Spectrophotometer:
- Turn on the spectrophotometer and allow it to warm up if necessary.
- Calibrate the spectrophotometer using distilled water as a blank. Set the wavelength to 540 nm.
- Measure the Absorbance:
- Transfer the prepared solution to a cuvette.
- Place the cuvette in the spectrophotometer and record the absorbance at 540 nm.
Step 4: Calculation
- Standard Curve:
- Prepare a standard curve using known concentrations of haemoglobin. Measure their absorbance at 540 nm and plot the results to create a standard curve.
- Calculate Haemoglobin Concentration:
- Use the absorbance value from the test sample and compare it to the standard curve to determine the haemoglobin concentration in grams per deciliter (g/dL).
Advantages
- High Accuracy: The method provides precise and reliable measurements of haemoglobin levels.
- Wide Applicability: Can differentiate between various haemoglobin types with additional testing.
- Standardization: Well-established method with standardized protocols.
Disadvantages
- Handling of Cyanide: Potassium cyanide is toxic, requiring careful handling and disposal.
- Time-Consuming: Takes longer than some point-of-care tests, requiring 15-20 minutes to complete.
- Interferences: Certain substances (e.g., elevated bilirubin or lipemia) can affect absorbance measurements.
Errors Involved in Haemoglobin Estimation
1. Pre-Analytical Errors
- Sample Collection:
-
- Aseptic Technique: Not using an aseptic technique can lead to contamination. Blood samples should be collected using sterile equipment and proper skin antisepsis.
- Vascular Complications: Incorrect venipuncture can result in hemolysis. Use a gentle approach to avoid damaging red blood cells.
- Storage Conditions:
-
- Time Delay: If blood samples are not processed promptly, haemoglobin can degrade, leading to inaccurate results. It is recommended to analyze samples within 1-2 hours of collection.
- Temperature: If processing is delayed, samples should be kept at 2-8°C. Prolonged exposure to room temperature can cause hemolysis.
- Anticoagulant Choice:
-
- EDTA vs. Citrate: An inappropriate anticoagulant can alter the sample’s haemoglobin behaviour. EDTA is commonly used for haematological tests.
2. Analytical Errors
- Reagent Preparation:
-
- Concentration Issues: Incorrect preparation of Drabkin’s solution can lead to inaccurate results. Regular checks on the reagent concentration are vital.
- Expiration: Using expired reagents can result in ineffective hemolysis or the formation of the cyanmethemoglobin complex.
- Inadequate Mixing:
-
- Incomplete Hemolysis: If the blood sample is not thoroughly mixed with the reagent, the hemolysis may be incomplete, affecting the accuracy of the measurement.
- Spectrophotometer Calibration:
-
- Wavelength Accuracy: Ensure that the spectrophotometer is calibrated to the correct wavelength (540 nm) for optimal measurement of cyanmethemoglobin.
- Absorbance Range: Regularly check the instrument’s absorbance range to ensure it functions within the specified limits.
- Interference from Other Substances:
-
- Bilirubin and Lipemia: High levels of bilirubin or lipids can interfere with the colourimetric measurement, leading to falsely elevated or decreased haemoglobin readings. Pre-treatment of samples may be necessary in such cases.
3. Post-Analytical Errors
- Data Interpretation:
-
- Reference Ranges: Results can be misinterpreted if the laboratory does not use appropriate reference ranges based on the tested population.
- Variability: Variability in results may arise from differences in methodology or equipment between laboratories.
- Human Error:
-
- Pipetting Errors: Inaccurate pipetting can lead to errors in sample and reagent volumes. Ensure proper techniques and use calibrated pipettes.
- Calculation Mistakes: Errors in calculating haemoglobin concentration from absorbance values can skew results.
Standardization of Instruments for Hemoglobin Estimation
1. Calibration of Spectrophotometer
- Blank Calibration:
-
- Use distilled water or a blank of the reagent solution (Drabkin’s solution) to set the baseline absorbance to zero. This step ensures that only the absorbance from the haemoglobin is measured.
- Standard Curve Preparation:
-
- Create a standard curve using several known haemoglobin concentrations (e.g., 0, 5, 10, 15 g/dL). Measure the absorbance of these standards to establish a relationship between absorbance and concentration.
- Plot the absorbance against haemoglobin concentration to derive the equation for future calculations.
2. Quality Control
- Control Samples:
-
- Use quality control samples with known haemoglobin concentrations alongside patient samples. Regular testing of controls helps monitor the accuracy and precision of the method.
- Analyze control samples daily to ensure the system is functioning correctly.
- Documentation:
-
- Maintain a log of all control measurements, calibration data, and any adjustments made to the equipment or procedures. This documentation is crucial for tracking performance over time.
3. Routine Maintenance
- Cleaning:
-
- Regularly clean cuvettes and the spectrophotometer to prevent contamination and ensure consistent results. Follow the manufacturer’s recommendations for cleaning procedures.
- Professional Servicing:
-
- Schedule periodic servicing and calibrating of the spectrophotometer by qualified technicians to maintain accuracy and reliability.
4. Training of Personnel
- Standard Operating Procedures (SOPs):
-
- Develop and implement clear SOPs for all aspects of haemoglobin testing, including specimen collection, reagent preparation, measurement, and interpretation.
- Ensure that all laboratory personnel know and adhere to these SOPs.
- Training Programs:
-
- Provide regular training for staff on the latest techniques, equipment use, and error-reduction strategies. Continuous education helps reduce human error and improve overall laboratory performance.