Introduction
-
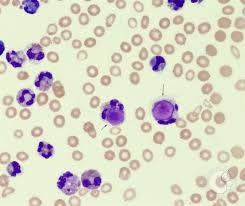
Peripheral blood smear examination is a fundamental hematological technique used to study the morphology of blood cells.
-
It helps in the evaluation of red blood cells (RBCs), white blood cells (WBCs), and platelets in terms of size, shape, number, and structural abnormalities.
-
Blood smear analysis is essential for diagnosing:
-
Anemias
-
Leukemias
-
Malaria and other hemoparasites
-
Platelet disorders
-
Hemolytic conditions
-
-
It complements automated hematology analyzers by providing morphological details that machines cannot fully interpret.
-
Proper preparation and staining are critical because poor technique can lead to:
-
Distorted cell morphology
-
Improper distribution of cells
-
Staining artifacts
-
Types of Blood Smears
A. Thin Blood Smear
-
Most commonly used technique.
-
Prepared by spreading a drop of blood across a slide.
-
Used for:
-
Differential leukocyte count
-
RBC morphology study
-
Platelet estimation
-
-
The ideal smear has:
-
Tongue-shaped appearance
-
Smooth feathered edge
-
Uniform cell distribution
-
Monolayer area where cells do not overlap
-
B. Thick Blood Smear
-
Prepared by placing a larger drop of blood without spreading thinly.
-
Mainly used for:
-
Detection of malaria parasites
-
Hemoparasite screening
-
-
RBCs are lysed during staining, concentrating parasites for easier detection.
Blood Smear Preparation
Requirements for Blood Smear Preparation
To ensure high-quality blood smear preparation and staining, the following materials and equipment are needed:
Materials
- Glass slides: Clean, grease-free microscope slides.
- Spreader slide: A second slide is used to spread the blood.
- Capillary tubes or micropipettes: For blood collection (with EDTA if using an anticoagulated sample).
- Marker or pencil: To label the slides.
- Immersion oil: For high-resolution microscopy.
Reagents
- Anticoagulated blood sample: Collected using EDTA to prevent clotting. Ideally, the smear should be prepared within 2 hours to avoid morphological changes.
- Romanowsky stains: Includes:
- Wright’s stain
- Leishman’s stain
- Giemsa stain
- May-Grünwald stain
Staining Equipment
- Staining jars: For dipping slides into stain and buffer solutions.
- Buffered distilled water: Typically, pH 6.8 for optimal staining.
Microscope

Light microscope with an oil immersion objective (100x magnification) for detailed examination.
Blood Smear Preparation Procedure
The quality of the blood smear depends heavily on the technique used. Below is a step-by-step guide to creating a well-prepared smear: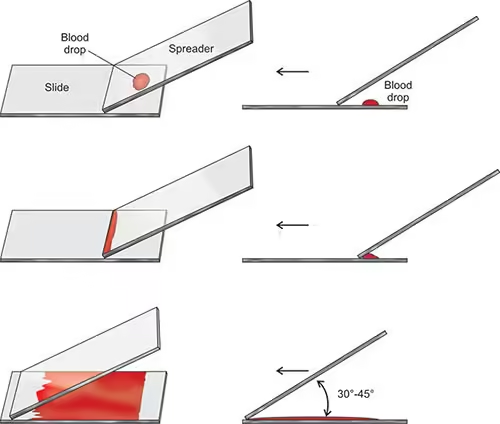
- Labelling the Slide
-
- Use a pencil or marker to label one end of the glass slide with patient identification information, as some stains (e.g., Wright’s) can wash off ink.
-
- Collect 2-3 µL of blood using a capillary tube or micropipette.
- Mix the sample using anticoagulated blood by gently inverting the collection tube to prevent clumping.
- Applying the Blood to the Slide
-
- Place the drop of blood about 1-2 cm from one end of the slide. This should be a small, well-formed drop—if too large, it will spread unevenly.
- Spreading the Blood

-
- Hold the spreader slide at a 30-45° angle.
- Pull the spreader slide backwards to touch the blood drop, allowing the blood to spread along the edge of the spreader slide.
- Push the spreader slide forward in a quick, smooth motion to create an even smear.
- The smear should thin out towards the other end of the slide, forming a feathered edge where cells are spread in a monolayer.
- Air Drying
-
- Allow the slide to air dry completely. Avoid blowing on the slide or using heat, which can distort the cells.
Staining Procedure for Blood Smears
Staining is critical for differentiating various blood cells, as the dyes interact with cell components based on their chemical properties. The most commonly used stains are Romanowsky-type stains, such as Leishman, Wright, and Giemsa stains.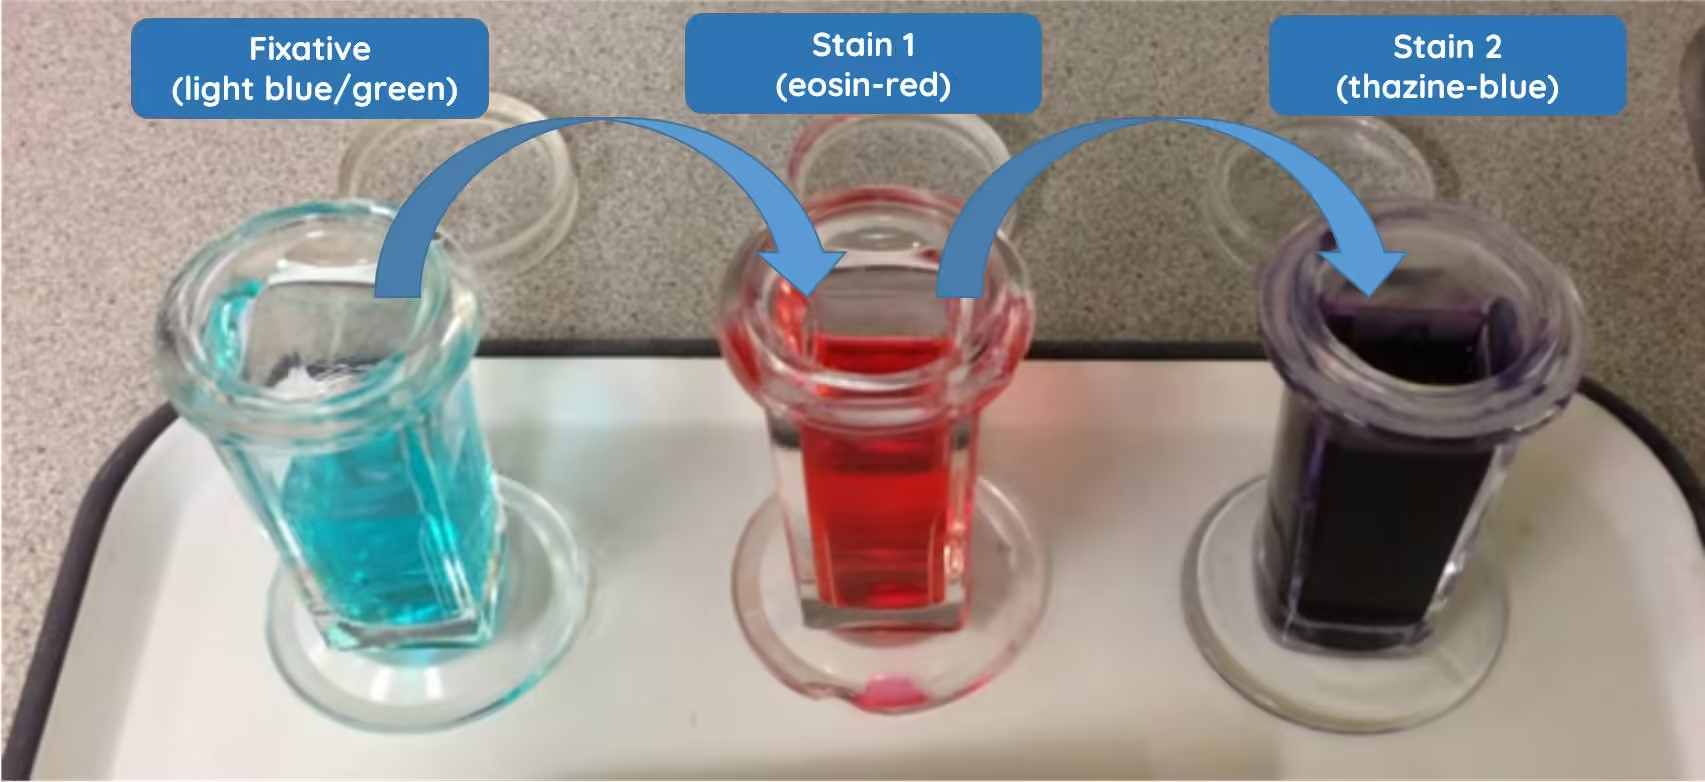
Leishman Staining
Principle of Leishman Stain
-
Leishman stain belongs to the Romanowsky group of stains.
-
It contains:
-
Leishman powder (methylene blue + eosin)
-
Methanol (acts as solvent and fixative)
-
-
The stain works on the principle of acid–base interaction:
-
Eosin (acidic dye) stains basic components (hemoglobin, eosinophil granules) → pink/red
-
Methylene blue/Azure (basic dye) stains acidic components (nucleus, RNA) → blue/purple
-
-
Proper staining requires buffered water (pH 6.8) for optimal color differentiation.
Reagents Required
-
Air-dried thin blood smear
-
Leishman stain solution
-
Buffered water (pH 6.8)
-
Distilled water (for washing)
-
Staining rack
-
Microscope with oil immersion
Staining Procedure
-
Prepare a thin peripheral blood smear.
-
Allow it to air dry completely.
-
Do not heat or blow on the slide.
Step 2: Fixation
-
Place the slide on a staining rack.
-
Cover the smear completely with Leishman stain.
-
Allow it to stand for 2 minutes.
-
Methanol in the stain acts as a fixative.
-
Step 3: Dilution with Buffer
-
Add double the amount of buffered water (pH 6.8) to the stain already on the slide.
-
Mix gently by blowing or gently rocking the slide.
-
Allow staining for 8–10 minutes.
Step 4: Washing
-
Gently wash the slide with distilled water.
-
Do not direct strong water flow directly onto the smear.
-
Drain excess water carefully.
Step 5: Drying
-
Stand the slide upright.
-
Allow it to air dry completely.
-
Do not wipe the surface.
Step 6: Microscopic Examination
-
Examine under 10× to locate the monolayer area.
-
Use 40× for general morphology.
-
Use 100× oil immersion for detailed examination and differential count.
Staining Results
| Component | Color |
|---|---|
| RBCs | Pink to salmon |
| Nuclei of WBCs | Purple |
| Neutrophil granules | Lilac |
| Eosinophil granules | Orange-red |
| Basophil granules | Deep blue |
| Platelets | Violet-purple |
Wright’s Staining
Principle
-
Wright’s stain is a member of the Romanowsky group of stains used for peripheral blood smears and bone marrow smears.
-
It contains:
-
Eosin Y (acidic dye)
-
Methylene blue and Azure dyes (basic dyes)
-
Methanol (acts as fixative and solvent)
-
-
The staining is based on acid–base interactions:
-
Acidic dye stains basic structures (hemoglobin, eosinophil granules) → red/orange
-
Basic dye stains acidic structures (nucleus, RNA) → blue/purple
-
-
Optimal staining requires buffered water at pH 6.4–6.8.
Reagents Required
-
Air-dried thin blood smear
-
Wright stain solution
-
Phosphate buffer (pH 6.4–6.8)
-
Distilled water
-
Staining rack
-
Microscope with oil immersion
Wright’s Staining Procedure
-
Prepare a thin peripheral blood smear.
-
Allow it to air dry completely.
Step 2: Fixation
-
Place the slide on a staining rack.
-
Flood the smear with Wright stain solution.
-
Allow fixation for 1–3 minutes.
-
Methanol present in the stain fixes the smear.
-
Step 3: Dilution and Staining
-
Add an equal amount of buffered water (pH 6.4–6.8).
-
Mix gently by rocking the slide until a metallic sheen appears.
-
Allow staining for 4–6 minutes.
Step 4: Washing
-
Gently rinse with distilled water.
-
Avoid direct forceful washing.
Step 5: Drying
-
Stand the slide upright.
-
Air dry completely.
Step 6: Microscopic Examination
-
Scan under 10× objective.
-
Examine cell morphology under 40×.
-
Use 100× oil immersion for differential count and detailed morphology.
Staining Results
| Component | Color |
|---|---|
| RBCs | Pink to red |
| Nuclei of WBCs | Blue to purple |
| Neutrophil granules | Pale lilac |
| Eosinophil granules | Orange-red |
| Basophil granules | Deep blue |
| Platelets | Purple |
Giemsa Staining
Principle
-
Giemsa stain is a Romanowsky-type stain widely used in hematology, cytogenetics, and parasitology.
-
It contains:
-
Azure dyes (oxidized methylene blue)
-
Methylene blue
-
Eosin Y
-
Dissolved in methanol and glycerol
-
-
The staining is based on acid–base interaction and Romanowsky effect:
-
Eosin (acidic dye) stains basic components (hemoglobin, eosinophil granules) → pink/red
-
Azure/methylene blue (basic dyes) stain acidic components (nucleus, RNA) → blue/purple
-
-
Optimal staining occurs at pH 6.8 buffer.
Uses of Giemsa Stain
-
Peripheral blood smear examination.
-
Bone marrow smears.
-
Detection of hemoparasites:
-
Malaria
-
Microfilaria
-
-
Cytogenetics (G-banding of chromosomes).
-
Demonstration of intracellular organisms.
Reagents Required
-
Air-dried thin or thick smear
-
Stock Giemsa stain
-
Buffered water (pH 6.8)
-
Distilled water
-
Staining jar or rack
Giemsa Staining Procedure (Thin Smear)
-
Prepare a thin blood smear.
-
Allow it to air dry completely.
Step 2: Fixation
-
Fix the smear with absolute methanol for 2–3 minutes.
-
Air dry after fixation.
Step 3: Dilution of Stain
-
Dilute Giemsa stain with buffered water (pH 6.8).
-
Common dilution: 1:10 or 1:20.
-
Step 4: Staining
-
Flood the slide with diluted Giemsa stain.
-
Allow staining for 15–30 minutes (longer than Wright/Leishman).
Step 5: Washing
-
Gently rinse with buffered water.
-
Avoid direct strong stream.
Step 6: Drying
-
Stand upright.
-
Air dry completely.
Step 7: Microscopic Examination
-
Scan under 10×.
-
Examine morphology under 40×.
-
Use 100× oil immersion for parasite detection and differential count.
Giemsa Staining (Thick Smear for Malaria)
-
Thick smear is not fixed with methanol.
-
RBCs lyse during staining.
-
Parasites remain concentrated for easier detection.
Staining Results
| Component | Color |
|---|---|
| RBCs | Pink |
| Nuclei of WBCs | Purple-blue |
| Cytoplasm of lymphocytes | Sky blue |
| Neutrophil granules | Fine lilac |
| Eosinophil granules | Orange-red |
| Basophil granules | Dark blue |
| Platelets | Purple |
| Malaria parasite nucleus | Red |
| Malaria parasite cytoplasm | Blue |
Microscopic Examination of the Blood Smear
Once the blood smear is prepared and stained, it is ready for microscopic examination. The following steps outline how to examine the smear properly:
Low Power Scanning (10x or 40x objective)
- Begin with low magnification to identify the area where the cells are evenly distributed (the feathered edge of the smear).
- Ensure the cells are well-spread and not overlapping. This area provides the most reliable data for differential counts.
High Power Examination (100x Oil Immersion)
- Apply a small drop of immersion oil to the slide and switch to the 100x oil immersion objective.
- Examine the blood cells closely, paying attention to:
- Red blood cells (RBCs): Evaluate their shape, size, colour (central pallor), and any inclusions or deformities (e.g., anisocytosis, poikilocytosis).
- White blood cells (WBCs): Perform a differential count, noting the proportion of neutrophils, lymphocytes, monocytes, eosinophils, and basophils. Check for abnormal or immature forms of WBCs (e.g., blasts).
- Platelets: Assess their number, size, and distribution.
Common Problems and Solutions
1. Problems During Smear Preparation
Cause:
-
Large drop of blood
-
Low angle of spreader (<30°)
-
Slow spreading
Effect:
-
Overlapping RBCs
-
Poor morphology assessment
Solution:
-
Use smaller blood drop
-
Maintain 30–45° angle
-
Spread smoothly and quickly
B. Smear Too Thin / Short
Cause:
-
Very small drop
-
High angle (>45°)
-
Excessive pressure
Effect:
-
Cells concentrated at feathered edge
-
Inadequate monolayer area
Solution:
-
Adjust blood volume
-
Maintain correct angle
C. Uneven Distribution of Cells
Cause:
-
Jerky movement
-
Dirty slide
-
Irregular spreader edge
Effect:
-
Clumping of cells
-
Misleading differential count
Solution:
-
Use clean grease-free slides
-
Smooth, continuous motion
D. Tail, Ridges, or Streaks
Cause:
-
Rough slide edge
-
Delay in spreading
-
Dust particles
Solution:
-
Use polished spreader slide
-
Spread immediately after placing drop
2. Problems During Fixation
A. Inadequate Fixation
Cause:
-
Insufficient methanol
-
Wet smear before fixation
Effect:
-
Cell distortion
-
Washing off of smear
Solution:
-
Ensure complete air drying
-
Fix with fresh methanol for 2–3 minutes
B. Over-Fixation
Cause:
-
Excess fixation time
Effect:
-
Poor staining quality
Solution:
-
Follow recommended fixation time
3. Problems During Staining
Cause:
-
High pH buffer (>6.8)
-
Excess staining time
-
Inadequate washing
Solution:
-
Maintain buffer pH 6.8
-
Reduce staining time
-
Proper washing
B. Smear Too Red
Cause:
-
Low pH buffer
-
Excess washing
Solution:
-
Correct buffer pH
-
Gentle washing
C. Pale Staining
Cause:
-
Short staining time
-
Diluted stain
-
Old stain
Solution:
-
Increase staining time
-
Use fresh filtered stain
D. Stain Precipitate on Slide
Cause:
-
Unfiltered stain
-
Drying of stain during procedure
Effect:
-
Granular artifacts resembling parasites
Solution:
-
Filter stain before use
-
Avoid drying during staining
4. Problems During Washing and Drying
A. Smear Washed Off
Cause:
-
Forceful washing
-
Poor fixation
Solution:
-
Gentle washing
-
Proper fixation
B. Water Artifacts
Cause:
-
Use of tap water with impurities
-
Incomplete drying
Solution:
-
Use distilled/buffered water
-
Air dry in upright position
5. Microscopic Examination Errors
A. Wrong Area Examined
Cause:
-
Examining thick area
Solution:
-
Examine monolayer area near feathered edge
B. Poor Oil Immersion Technique
Cause:
-
Dirty lens
-
Excess oil
Solution:
-
-
Clean lens properly
-
Use minimal oil
-